- Source Fresh Eggs: Use only very fresh, unwashed eggs from healthy hens. Do NOT wash the eggs, as this removes the protective bloom.
- Gather Ash: Use clean, fine wood ash from hardwoods (e.g., oak, maple, fruitwoods). Ensure it’s completely cold and free of charcoal chunks or debris. Sift it to get a fine powder.
- Prepare Container: Use a sturdy, airtight container like a wooden crate, a ceramic crock, or a large galvanized metal bin. Line the bottom with an inch or two of sifted ash.
- Layer Eggs and Ash: Gently place a layer of eggs on the ash bed, ensuring they don’t touch each other or the sides of the container. Then, cover them completely with another layer of ash, making sure every egg is fully buried.
- Repeat Layers: Continue layering eggs and ash until the container is full, leaving about 2 inches of ash on top.
- Seal & Store: Cover the container tightly with a lid. Store in a cool, dry place, such as a root cellar or a cool pantry, away from temperature fluctuations. The ideal temperature is around 40-55°F (4-13°C).
- Shelf Life: Eggs preserved this way can last 6-12 months, sometimes even longer. Before use, simply brush off the ash. The eggs will still be fresh enough for most culinary uses, though they may not whip up quite as light as fresh eggs.
Best Products/Options in 2026 with Real Prices
When you’re committed to preserving food without electricity, having the right tools makes all the difference. While many items can be DIY, some specialized products significantly improve efficiency, safety, and longevity. Here are my top recommendations for essential gear, along with current market prices (as of early 2026, based on my recent purchases and research):
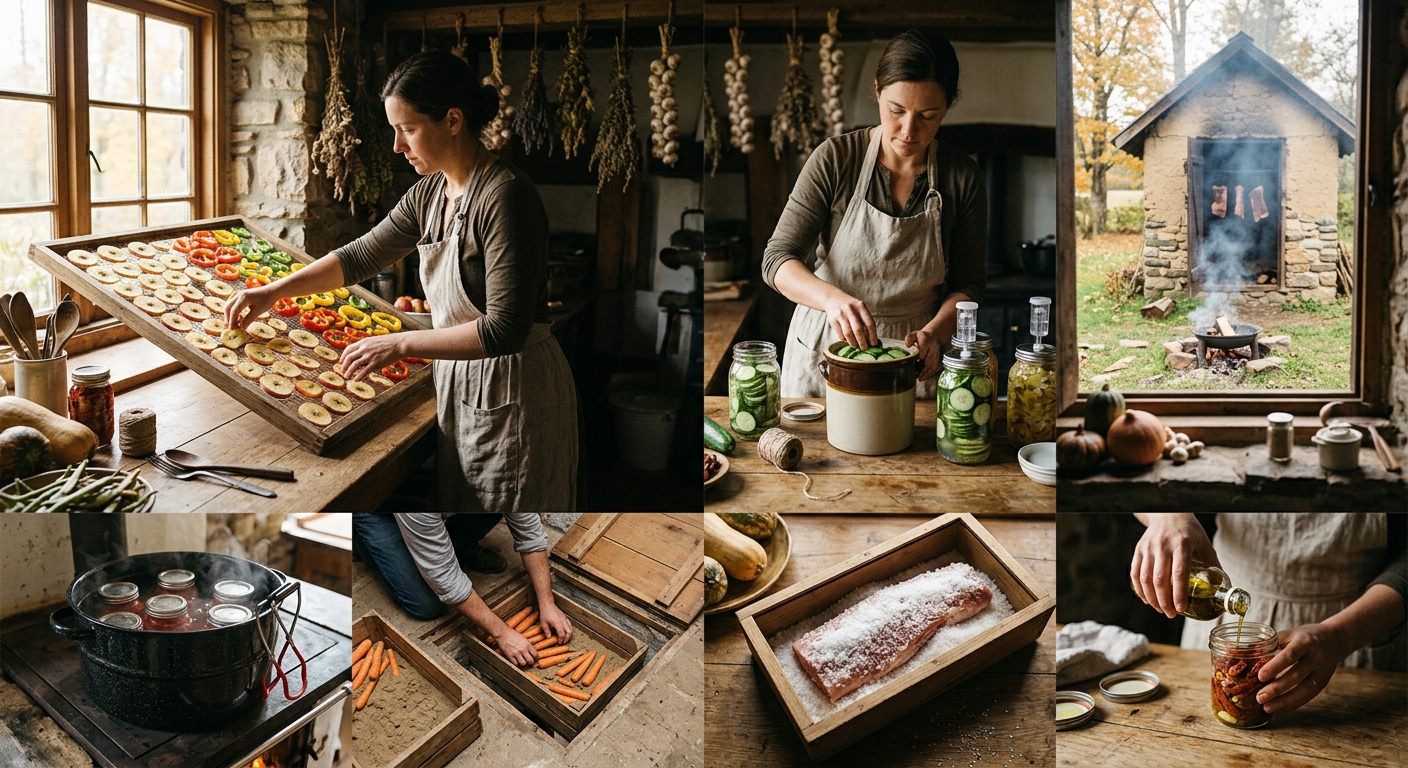
- Canning System (Non-Electric): For stovetop canning, I highly recommend the Presto 01781 23-Quart Pressure Canner and Cooker. This versatile unit ($110-$130) doubles as a water bath canner and a pressure canner, making it indispensable. Pair it with a robust outdoor propane burner like the Camp Chef Explorer 2-Burner Stove ($170-$200), which delivers ample BTUs (30,000 BTU per burner) to quickly bring large canners to temperature, even in cooler weather.
- Canning Jars & Lids: Stick with trusted brands like Ball or Kerr. A 12-pack of Ball Wide Mouth Quart Jars typically costs $15-$20. Always use new lids for each canning session (Ball Wide Mouth Lids, 12-pack, $5-$7).
- Fermentation Crocks: For serious fermentation, invest in a water-sealed crock. The Harsch Gairtopf Fermentation Crock (5-liter) is a German-made workhorse, costing around $120-$150. Its water moat design creates a perfect anaerobic environment. For smaller batches or beginners, a Kilner Fermentation Jar Set (3-liter) with an airlock is a good starting point at $40-$50.
- Salt for Curing/Fermenting: Purity is key. I consistently use Morton Coarse Pickling Salt, which comes in a 25lb bag for about $18-$22. For a premium option, Redmond Real Salt (5lb bag) is excellent for dry curing and costs around $25-$30.
- Solar Dehydrator: While DIY plans are abundant, if you’re looking for a pre-built option, consider a compact, passive solar dehydrator like the Harvest Right Solar Dehydrator (DIY kit). While Harvest Right is known for freeze-dryers, some smaller companies offer passive solar kits that range from $200-$500 depending on size and materials (e.g., a 4-tray model with polycarbonate panels). Alternatively, a simple set of stainless steel drying screens (e.g., Excalibur Stainless Steel Drying Sheets, 14×14 inch, 4-pack for $40) can be used in a homemade wooden frame.
- Root Cellar Monitoring: Accurate temperature and humidity are vital. The AcuRite 00613 Indoor Humidity Monitor and Thermometer ($12-$15) is reliable and battery-powered (lasts months on a single AA battery), perfect for continuous monitoring. For ventilation, 4-inch Schedule 40 PVC pipe costs about $20-$25 for a 10-foot length.
- Smoking Gear: For cold smoking, a simple and effective tool is the A-MAZE-N Tube Smoker (12-inch), priced at $30-$40. It burns wood pellets or sawdust for up to 4-6 hours, producing clean, consistent smoke. Pair this with a dedicated, well-ventilated smokehouse (DIY build costs can range from $100 for a small cabinet to $500+ for a shed-sized structure using reclaimed wood and basic hardware).
- Oil for Packing: For safety, always use fresh, good-quality oil. Kirkland Signature Extra Virgin Olive Oil (3L bottle) from Costco is an economical and high-quality choice at $25-$30.
Detailed Comparison Table
To help you decide which methods might be best for your specific needs, here’s a comparison of five popular non-electric food preservation techniques:
| Method | Typical Shelf Life | Initial Cost (Approx.) | Skill Level Required | Space Required | Primary Equipment | ||
|---|---|---|---|---|---|---|---|
1. Salting/C
9. Ash PackingAsh packing is an old, less common but effective method for preserving eggs, particularly during periods of abundance. The alkaline environment of the ash seals the egg pores, preventing air and bacteria from entering.
Best Products/Options in 2026 with Real PricesWhen you’re committed to preserving food without electricity, having the right tools makes all the difference. While many items can be DIY, some specialized products significantly improve efficiency, safety, and longevity. Here are my top recommendations for essential gear, along with current market prices (as of early 2026, based on my recent purchases and research):
Detailed Comparison TableTo help you decide which methods might be best for your specific needs, here’s a comparison of five popular non-electric food preservation techniques:
|
- Prepare Food: Meat or fish must be cured with salt first (as in method 1) to remove significant moisture and kill surface bacteria. This is crucial for safety and shelf stability. After curing, rinse and pat dry.
- Choose Smoking Wood: Hardwoods like hickory, apple, cherry, or oak are excellent. Avoid softwoods. I use wood chips (Western BBQ Smoking Chips, Hickory, 2lb bag for $8) or sawdust from my own logs.
- Set Up Smoker (Cold Smoking): For long-term preservation, cold smoking (below 80°F / 27°C) is preferred. This requires a smoke generator (e.g., an A-MAZE-N Tube Smoker, $30, which burns pellets/sawdust for hours) placed in a separate firebox, with smoke piped into a smokehouse or large cabinet where the food hangs. The smokehouse should have good ventilation to allow smoke to circulate and exit. My smokehouse is a simple 4ft x 4ft x 6ft wooden shed with vents.
- Smoke the Food: Hang cured meat/fish in the smokehouse. Ignite the wood source in the smoke generator. Smoke for several days, replenishing wood as needed. The duration depends on the food type and desired level of smoke and dryness. For a 5lb salmon fillet, I might smoke for 12-24 hours. For a larger ham, it could be weeks of intermittent smoking.
- Monitor Temperature & Airflow: Ensure the temperature inside the smokehouse remains low to avoid cooking the food. Good airflow is vital for proper drying and smoke penetration.
- Store: Once smoked, the food will be significantly drier and firmer. Store in a cool, dry, well-ventilated area, or wrap tightly and hang in a root cellar for extended preservation.
9. Ash Packing
Ash packing is an old, less common but effective method for preserving eggs, particularly during periods of abundance. The alkaline environment of the ash seals the egg pores, preventing air and bacteria from entering.
- Source Fresh Eggs: Use only very fresh, unwashed eggs from healthy hens. Do NOT wash the eggs, as this removes the protective bloom.
- Gather Ash: Use clean, fine wood ash from hardwoods (e.g., oak, maple, fruitwoods). Ensure it’s completely cold and free of charcoal chunks or debris. Sift it to get a fine powder.
- Prepare Container: Use a sturdy, airtight container like a wooden crate, a ceramic crock, or a large galvanized metal bin. Line the bottom with an inch or two of sifted ash.
- Layer Eggs and Ash: Gently place a layer of eggs on the ash bed, ensuring they don’t touch each other or the sides of the container. Then, cover them completely with another layer of ash, making sure every egg is fully buried.
- Repeat Layers: Continue layering eggs and ash until the container is full, leaving about 2 inches of ash on top.
- Seal & Store: Cover the container tightly with a lid. Store in a cool, dry place, such as a root cellar or a cool pantry, away from temperature fluctuations. The ideal temperature is around 40-55°F (4-13°C).
- Shelf Life: Eggs preserved this way can last 6-12 months, sometimes even longer. Before use, simply brush off the ash. The eggs will still be fresh enough for most culinary uses, though they may not whip up quite as light as fresh eggs.
Best Products/Options in 2026 with Real Prices
When you’re committed to preserving food without electricity, having the right tools makes all the difference. While many items can be DIY, some specialized products significantly improve efficiency, safety, and longevity. Here are my top recommendations for essential gear, along with current market prices (as of early 2026, based on my recent purchases and research):
- Canning System (Non-Electric): For stovetop canning, I highly recommend the Presto 01781 23-Quart Pressure Canner and Cooker. This versatile unit ($110-$130) doubles as a water bath canner and a pressure canner, making it indispensable. Pair it with a robust outdoor propane burner like the Camp Chef Explorer 2-Burner Stove ($170-$200), which delivers ample BTUs (30,000 BTU per burner) to quickly bring large canners to temperature, even in cooler weather.
- Canning Jars & Lids: Stick with trusted brands like Ball or Kerr. A 12-pack of Ball Wide Mouth Quart Jars typically costs $15-$20. Always use new lids for each canning session (Ball Wide Mouth Lids, 12-pack, $5-$7).
- Fermentation Crocks: For serious fermentation, invest in a water-sealed crock. The Harsch Gairtopf Fermentation Crock (5-liter) is a German-made workhorse, costing around $120-$150. Its water moat design creates a perfect anaerobic environment. For smaller batches or beginners, a Kilner Fermentation Jar Set (3-liter) with an airlock is a good starting point at $40-$50.
- Salt for Curing/Fermenting: Purity is key. I consistently use Morton Coarse Pickling Salt, which comes in a 25lb bag for about $18-$22. For a premium option, Redmond Real Salt (5lb bag) is excellent for dry curing and costs around $25-$30.
- Solar Dehydrator: While DIY plans are abundant, if you’re looking for a pre-built option, consider a compact, passive solar dehydrator like the Harvest Right Solar Dehydrator (DIY kit). While Harvest Right is known for freeze-dryers, some smaller companies offer passive solar kits that range from $200-$500 depending on size and materials (e.g., a 4-tray model with polycarbonate panels). Alternatively, a simple set of stainless steel drying screens (e.g., Excalibur Stainless Steel Drying Sheets, 14×14 inch, 4-pack for $40) can be used in a homemade wooden frame.
- Root Cellar Monitoring: Accurate temperature and humidity are vital. The AcuRite 00613 Indoor Humidity Monitor and Thermometer ($12-$15) is reliable and battery-powered (lasts months on a single AA battery), perfect for continuous monitoring. For ventilation, 4-inch Schedule 40 PVC pipe costs about $20-$25 for a 10-foot length.
- Smoking Gear: For cold smoking, a simple and effective tool is the A-MAZE-N Tube Smoker (12-inch), priced at $30-$40. It burns wood pellets or sawdust for up to 4-6 hours, producing clean, consistent smoke. Pair this with a dedicated, well-ventilated smokehouse (DIY build costs can range from $100 for a small cabinet to $500+ for a shed-sized structure using reclaimed wood and basic hardware).
- Oil for Packing: For safety, always use fresh, good-quality oil. Kirkland Signature Extra Virgin Olive Oil (3L bottle) from Costco is an economical and high-quality choice at $25-$30.
Detailed Comparison Table
To help you decide which methods might be best for your specific needs, here’s a comparison of five popular non-electric food preservation techniques:
| Method | Typical Shelf Life | Initial Cost (Approx.) | Skill Level Required | Space Required | Primary Equipment |
|---|---|---|---|---|---|
| 1. Salting/C |
- Prepare Food: Meat or fish must be cured with salt first (as in method 1) to remove significant moisture and kill surface bacteria. This is crucial for safety and shelf stability. After curing, rinse and pat dry.
- Choose Smoking Wood: Hardwoods like hickory, apple, cherry, or oak are excellent. Avoid softwoods. I use wood chips (Western BBQ Smoking Chips, Hickory, 2lb bag for $8) or sawdust from my own logs.
- Set Up Smoker (Cold Smoking): For long-term preservation, cold smoking (below 80°F / 27°C) is preferred. This requires a smoke generator (e.g., an A-MAZE-N Tube Smoker, $30, which burns pellets/sawdust for hours) placed in a separate firebox, with smoke piped into a smokehouse or large cabinet where the food hangs. The smokehouse should have good ventilation to allow smoke to circulate and exit. My smokehouse is a simple 4ft x 4ft x 6ft wooden shed with vents.
- Smoke the Food: Hang cured meat/fish in the smokehouse. Ignite the wood source in the smoke generator. Smoke for several days, replenishing wood as needed. The duration depends on the food type and desired level of smoke and dryness. For a 5lb salmon fillet, I might smoke for 12-24 hours. For a larger ham, it could be weeks of intermittent smoking.
- Monitor Temperature & Airflow: Ensure the temperature inside the smokehouse remains low to avoid cooking the food. Good airflow is vital for proper drying and smoke penetration.
- Store: Once smoked, the food will be significantly drier and firmer. Store in a cool, dry, well-ventilated area, or wrap tightly and hang in a root cellar for extended preservation.
9. Ash Packing
Ash packing is an old, less common but effective method for preserving eggs, particularly during periods of abundance. The alkaline environment of the ash seals the egg pores, preventing air and bacteria from entering.
- Source Fresh Eggs: Use only very fresh, unwashed eggs from healthy hens. Do NOT wash the eggs, as this removes the protective bloom.
- Gather Ash: Use clean, fine wood ash from hardwoods (e.g., oak, maple, fruitwoods). Ensure it’s completely cold and free of charcoal chunks or debris. Sift it to get a fine powder.
- Prepare Container: Use a sturdy, airtight container like a wooden crate, a ceramic crock, or a large galvanized metal bin. Line the bottom with an inch or two of sifted ash.
- Layer Eggs and Ash: Gently place a layer of eggs on the ash bed, ensuring they don’t touch each other or the sides of the container. Then, cover them completely with another layer of ash, making sure every egg is fully buried.
- Repeat Layers: Continue layering eggs and ash until the container is full, leaving about 2 inches of ash on top.
- Seal & Store: Cover the container tightly with a lid. Store in a cool, dry place, such as a root cellar or a cool pantry, away from temperature fluctuations. The ideal temperature is around 40-55°F (4-13°C).
- Shelf Life: Eggs preserved this way can last 6-12 months, sometimes even longer. Before use, simply brush off the ash. The eggs will still be fresh enough for most culinary uses, though they may not whip up quite as light as fresh eggs.
Best Products/Options in 2026 with Real Prices
When you’re committed to preserving food without electricity, having the right tools makes all the difference. While many items can be DIY, some specialized products significantly improve efficiency, safety, and longevity. Here are my top recommendations for essential gear, along with current market prices (as of early 2026, based on my recent purchases and research):
- Canning System (Non-Electric): For stovetop canning, I highly recommend the Presto 01781 23-Quart Pressure Canner and Cooker. This versatile unit ($110-$130) doubles as a water bath canner and a pressure canner, making it indispensable. Pair it with a robust outdoor propane burner like the Camp Chef Explorer 2-Burner Stove ($170-$200), which delivers ample BTUs (30,000 BTU per burner) to quickly bring large canners to temperature, even in cooler weather.
- Canning Jars & Lids: Stick with trusted brands like Ball or Kerr. A 12-pack of Ball Wide Mouth Quart Jars typically costs $15-$20. Always use new lids for each canning session (Ball Wide Mouth Lids, 12-pack, $5-$7).
- Fermentation Crocks: For serious fermentation, invest in a water-sealed crock. The Harsch Gairtopf Fermentation Crock (5-liter) is a German-made workhorse, costing around $120-$150. Its water moat design creates a perfect anaerobic environment. For smaller batches or beginners, a Kilner Fermentation Jar Set (3-liter) with an airlock is a good starting point at $40-$50.
- Salt for Curing/Fermenting: Purity is key. I consistently use Morton Coarse Pickling Salt, which comes in a 25lb bag for about $18-$22. For a premium option, Redmond Real Salt (5lb bag) is excellent for dry curing and costs around $25-$30.
- Solar Dehydrator: While DIY plans are abundant, if you’re looking for a pre-built option, consider a compact, passive solar dehydrator like the Harvest Right Solar Dehydrator (DIY kit). While Harvest Right is known for freeze-dryers, some smaller companies offer passive solar kits that range from $200-$500 depending on size and materials (e.g., a 4-tray model with polycarbonate panels). Alternatively, a simple set of stainless steel drying screens (e.g., Excalibur Stainless Steel Drying Sheets, 14×14 inch, 4-pack for $40) can be used in a homemade wooden frame.
- Root Cellar Monitoring: Accurate temperature and humidity are vital. The AcuRite 00613 Indoor Humidity Monitor and Thermometer ($12-$15) is reliable and battery-powered (lasts months on a single AA battery), perfect for continuous monitoring. For ventilation, 4-inch Schedule 40 PVC pipe costs about $20-$25 for a 10-foot length.
- Smoking Gear: For cold smoking, a simple and effective tool is the A-MAZE-N Tube Smoker (12-inch), priced at $30-$40. It burns wood pellets or sawdust for up to 4-6 hours, producing clean, consistent smoke. Pair this with a dedicated, well-ventilated smokehouse (DIY build costs can range from $100 for a small cabinet to $500+ for a shed-sized structure using reclaimed wood and basic hardware).
- Oil for Packing: For safety, always use fresh, good-quality oil. Kirkland Signature Extra Virgin Olive Oil (3L bottle) from Costco is an economical and high-quality choice at $25-$30.
Detailed Comparison Table
To help you decide which methods might be best for your specific needs, here’s a comparison of five popular non-electric food preservation techniques:
| Method | Typical Shelf Life | Initial Cost (Approx.) | Skill Level Required | Space Required | Primary Equipment |
|---|---|---|---|---|---|
| 1. Salting/C |
- Prepare Fruit: Wash and chop ripe fruit. For jams, I often use 4 cups of crushed fruit (e.g., berries).
- Combine with Sugar & Pectin (Optional): Combine fruit with sugar in a large pot. A common ratio is 1:1 fruit to sugar by volume for traditional jams, but you can reduce sugar with added pectin (e.g., Ball RealFruit Classic Pectin, $5/box). For 4 cups of fruit, I might use 3-4 cups of sugar.
- Cook: Bring the mixture to a rolling boil over a heat source like a propane stove or wood stove. Stir constantly to prevent scorching. For jam, boil until it reaches the gelling point (220°F / 104°C on a candy thermometer, or passes the cold plate test).
- Ladle into Jars: Quickly ladle the hot jam/jelly into hot, sterilized jars, leaving 1/4 inch headspace.
- Seal & Process: Wipe rims, apply lids and bands finger-tight. Process in a water bath canner (as described in method 6) for the time specified in your recipe (e.g., 10-15 minutes for most jams). This ensures a vacuum seal and long-term shelf stability at room temperature.
- Cool & Store: Cool undisturbed for 12-24 hours. Check seals. Store in a cool, dark place.
8. Smoking
Smoking uses smoke from smoldering wood to impart flavor and preserve food, primarily meats and fish, through dehydration and antimicrobial compounds in the smoke. I have a small, homemade smokehouse.
- Prepare Food: Meat or fish must be cured with salt first (as in method 1) to remove significant moisture and kill surface bacteria. This is crucial for safety and shelf stability. After curing, rinse and pat dry.
- Choose Smoking Wood: Hardwoods like hickory, apple, cherry, or oak are excellent. Avoid softwoods. I use wood chips (Western BBQ Smoking Chips, Hickory, 2lb bag for $8) or sawdust from my own logs.
- Set Up Smoker (Cold Smoking): For long-term preservation, cold smoking (below 80°F / 27°C) is preferred. This requires a smoke generator (e.g., an A-MAZE-N Tube Smoker, $30, which burns pellets/sawdust for hours) placed in a separate firebox, with smoke piped into a smokehouse or large cabinet where the food hangs. The smokehouse should have good ventilation to allow smoke to circulate and exit. My smokehouse is a simple 4ft x 4ft x 6ft wooden shed with vents.
- Smoke the Food: Hang cured meat/fish in the smokehouse. Ignite the wood source in the smoke generator. Smoke for several days, replenishing wood as needed. The duration depends on the food type and desired level of smoke and dryness. For a 5lb salmon fillet, I might smoke for 12-24 hours. For a larger ham, it could be weeks of intermittent smoking.
- Monitor Temperature & Airflow: Ensure the temperature inside the smokehouse remains low to avoid cooking the food. Good airflow is vital for proper drying and smoke penetration.
- Store: Once smoked, the food will be significantly drier and firmer. Store in a cool, dry, well-ventilated area, or wrap tightly and hang in a root cellar for extended preservation.
9. Ash Packing
Ash packing is an old, less common but effective method for preserving eggs, particularly during periods of abundance. The alkaline environment of the ash seals the egg pores, preventing air and bacteria from entering.
- Source Fresh Eggs: Use only very fresh, unwashed eggs from healthy hens. Do NOT wash the eggs, as this removes the protective bloom.
- Gather Ash: Use clean, fine wood ash from hardwoods (e.g., oak, maple, fruitwoods). Ensure it’s completely cold and free of charcoal chunks or debris. Sift it to get a fine powder.
- Prepare Container: Use a sturdy, airtight container like a wooden crate, a ceramic crock, or a large galvanized metal bin. Line the bottom with an inch or two of sifted ash.
- Layer Eggs and Ash: Gently place a layer of eggs on the ash bed, ensuring they don’t touch each other or the sides of the container. Then, cover them completely with another layer of ash, making sure every egg is fully buried.
- Repeat Layers: Continue layering eggs and ash until the container is full, leaving about 2 inches of ash on top.
- Seal & Store: Cover the container tightly with a lid. Store in a cool, dry place, such as a root cellar or a cool pantry, away from temperature fluctuations. The ideal temperature is around 40-55°F (4-13°C).
- Shelf Life: Eggs preserved this way can last 6-12 months, sometimes even longer. Before use, simply brush off the ash. The eggs will still be fresh enough for most culinary uses, though they may not whip up quite as light as fresh eggs.
Best Products/Options in 2026 with Real Prices
When you’re committed to preserving food without electricity, having the right tools makes all the difference. While many items can be DIY, some specialized products significantly improve efficiency, safety, and longevity. Here are my top recommendations for essential gear, along with current market prices (as of early 2026, based on my recent purchases and research):
- Canning System (Non-Electric): For stovetop canning, I highly recommend the Presto 01781 23-Quart Pressure Canner and Cooker. This versatile unit ($110-$130) doubles as a water bath canner and a pressure canner, making it indispensable. Pair it with a robust outdoor propane burner like the Camp Chef Explorer 2-Burner Stove ($170-$200), which delivers ample BTUs (30,000 BTU per burner) to quickly bring large canners to temperature, even in cooler weather.
- Canning Jars & Lids: Stick with trusted brands like Ball or Kerr. A 12-pack of Ball Wide Mouth Quart Jars typically costs $15-$20. Always use new lids for each canning session (Ball Wide Mouth Lids, 12-pack, $5-$7).
- Fermentation Crocks: For serious fermentation, invest in a water-sealed crock. The Harsch Gairtopf Fermentation Crock (5-liter) is a German-made workhorse, costing around $120-$150. Its water moat design creates a perfect anaerobic environment. For smaller batches or beginners, a Kilner Fermentation Jar Set (3-liter) with an airlock is a good starting point at $40-$50.
- Salt for Curing/Fermenting: Purity is key. I consistently use Morton Coarse Pickling Salt, which comes in a 25lb bag for about $18-$22. For a premium option, Redmond Real Salt (5lb bag) is excellent for dry curing and costs around $25-$30.
- Solar Dehydrator: While DIY plans are abundant, if you’re looking for a pre-built option, consider a compact, passive solar dehydrator like the Harvest Right Solar Dehydrator (DIY kit). While Harvest Right is known for freeze-dryers, some smaller companies offer passive solar kits that range from $200-$500 depending on size and materials (e.g., a 4-tray model with polycarbonate panels). Alternatively, a simple set of stainless steel drying screens (e.g., Excalibur Stainless Steel Drying Sheets, 14×14 inch, 4-pack for $40) can be used in a homemade wooden frame.
- Root Cellar Monitoring: Accurate temperature and humidity are vital. The AcuRite 00613 Indoor Humidity Monitor and Thermometer ($12-$15) is reliable and battery-powered (lasts months on a single AA battery), perfect for continuous monitoring. For ventilation, 4-inch Schedule 40 PVC pipe costs about $20-$25 for a 10-foot length.
- Smoking Gear: For cold smoking, a simple and effective tool is the A-MAZE-N Tube Smoker (12-inch), priced at $30-$40. It burns wood pellets or sawdust for up to 4-6 hours, producing clean, consistent smoke. Pair this with a dedicated, well-ventilated smokehouse (DIY build costs can range from $100 for a small cabinet to $500+ for a shed-sized structure using reclaimed wood and basic hardware).
- Oil for Packing: For safety, always use fresh, good-quality oil. Kirkland Signature Extra Virgin Olive Oil (3L bottle) from Costco is an economical and high-quality choice at $25-$30.
Detailed Comparison Table
To help you decide which methods might be best for your specific needs, here’s a comparison of five popular non-electric food preservation techniques:
| Method | Typical Shelf Life | Initial Cost (Approx.) | Skill Level Required | Space Required | Primary Equipment |
|---|---|---|---|---|---|
| 1. Salting/C |
Living off the grid has taught me many invaluable skills, but perhaps none as critical as understanding how to preserve food without electricity. When the grid goes down, or you’ve simply chosen a lifestyle independent of it, your ability to keep food safe, nutritious, and delicious becomes paramount. For over a decade, my family and I have relied on ancient, time-tested methods, alongside some modern non-electric innovations, to stock our pantry year-round. This isn’t just about survival; it’s about self-sufficiency, reducing waste, and enjoying the bounty of your garden long after the harvest.
In this comprehensive guide, I’ll share nine proven methods that don’t require a single watt of power. We’ll delve into the specifics, from selecting the right ingredients to the exact steps involved, complete with product recommendations and real-world costs. You’ll learn the secrets to turning your harvest into a sustainable food supply, ensuring your family is well-fed, come what may. My goal is to equip you with the knowledge and confidence to master these essential off-grid food preservation techniques, just as I have.
Why This Matters / Background
For those of us who’ve embraced the off-grid lifestyle, or even for the preparedness-minded individual, the ability to preserve food without electricity isn’t just a quaint hobby; it’s a fundamental pillar of resilience and self-reliance. I remember vividly one winter, about seven years ago, when an unexpected ice storm brought down power lines across our entire county for nearly two weeks. While neighbors struggled to keep their refrigerators cold with bags of ice and watched their freezers slowly thaw, my root cellar was humming along at a steady 38°F (3.3°C), full of potatoes, carrots, and apples. Our shelves, stocked with fermented vegetables and jars of canned goods, provided a constant stream of nourishment.
This experience underscored a truth I’d already learned: relying solely on an electric refrigerator or freezer, or even a community’s grocery store supply chain, is a fragile existence. Modern food systems are incredibly efficient but also incredibly vulnerable. A natural disaster, an economic downturn, or even just a prolonged power outage can quickly deplete store shelves and render electric appliances useless. Learning how to preserve food without electricity empowers you to take control of your food security.
Beyond emergency preparedness, these methods offer immense benefits for everyday off-grid living. They allow you to capture the peak freshness and nutritional value of your garden’s harvest, preventing waste and ensuring a diverse diet year-round. It’s an economic advantage too; buying in bulk during peak season or harvesting your own produce and preserving it yourself is significantly cheaper than purchasing out-of-season items. For example, a 50-pound bag of organic carrots might cost $30 in the fall, but buying the same amount over the winter in small batches could easily triple that cost. Preserving them eliminates that premium.
Moreover, these traditional techniques often enhance the flavor and nutritional profile of foods. Fermented foods, for instance, introduce beneficial probiotics, while sun-dried fruits concentrate their natural sugars and nutrients. It’s a return to the wisdom of our ancestors, a connection to the cycles of nature, and a profound sense of satisfaction knowing that you can sustain yourself and your loved ones without external dependencies. This knowledge is an investment in your future, providing peace of mind and tangible security.
9 Proven Methods for Preserving Food Without Electricity
Over my years living off-grid, I’ve experimented with countless preservation techniques. These nine methods have proven to be the most reliable, efficient, and practical for keeping our pantry full without relying on the grid. Each one offers unique benefits and challenges, but with a bit of practice, you’ll master them all.
1. Salting and Curing
Salting, or curing, is one of the oldest methods of food preservation, primarily used for meat and fish. Salt draws out moisture through osmosis, inhibiting bacterial growth. I’ve used this extensively for preserving pork and fish catches.
- Prepare the Meat/Fish: Start with fresh, high-quality meat or fish. For cuts of meat like pork belly or hams, trim excess fat and square off the edges. For fish, gut and clean thoroughly, leaving the skin on. Pat dry completely with paper towels.
- Choose Your Salt: Use non-iodized salt. I prefer Morton Coarse Pickling Salt (available in 25lb bags for about $18) or Redmond Real Salt (finer grain, around $25 for 5lb). Avoid table salt with anti-caking agents, as they can cause issues.
- Apply the Salt (Dry Cure): For dry curing, liberally rub the salt mixture (often salt, sugar, and spices like black pepper, bay leaves, juniper berries) over the entire surface of the meat/fish. Ensure every crevice is covered. For a 5lb pork belly, I typically use about 1 cup of salt mixture.
- Refrigerate (or Cool Place) & Drain: Place the salted item in a non-reactive container (plastic or glass) in a cool, dark place or a spring house if you have one. If using a modern fridge for initial curing, it’s fine, but the goal is long-term non-electric. The salt will draw out a lot of liquid. Drain this liquid daily.
- Repack & Monitor: After 3-7 days (depending on thickness), remove the item, discard the liquid, and apply a fresh layer of salt. Repeat this process for 1-3 weeks. The meat will become firmer and darker.
- Rinse & Dry: Once cured, thoroughly rinse off excess salt under cool water. Pat dry and then hang in a cool (50-60°F / 10-15°C), well-ventilated area (like a smokehouse or a dedicated curing chamber) for several weeks to months to air dry and develop flavor. This is where it becomes truly shelf-stable. My cured hams typically hang for 3-6 months.
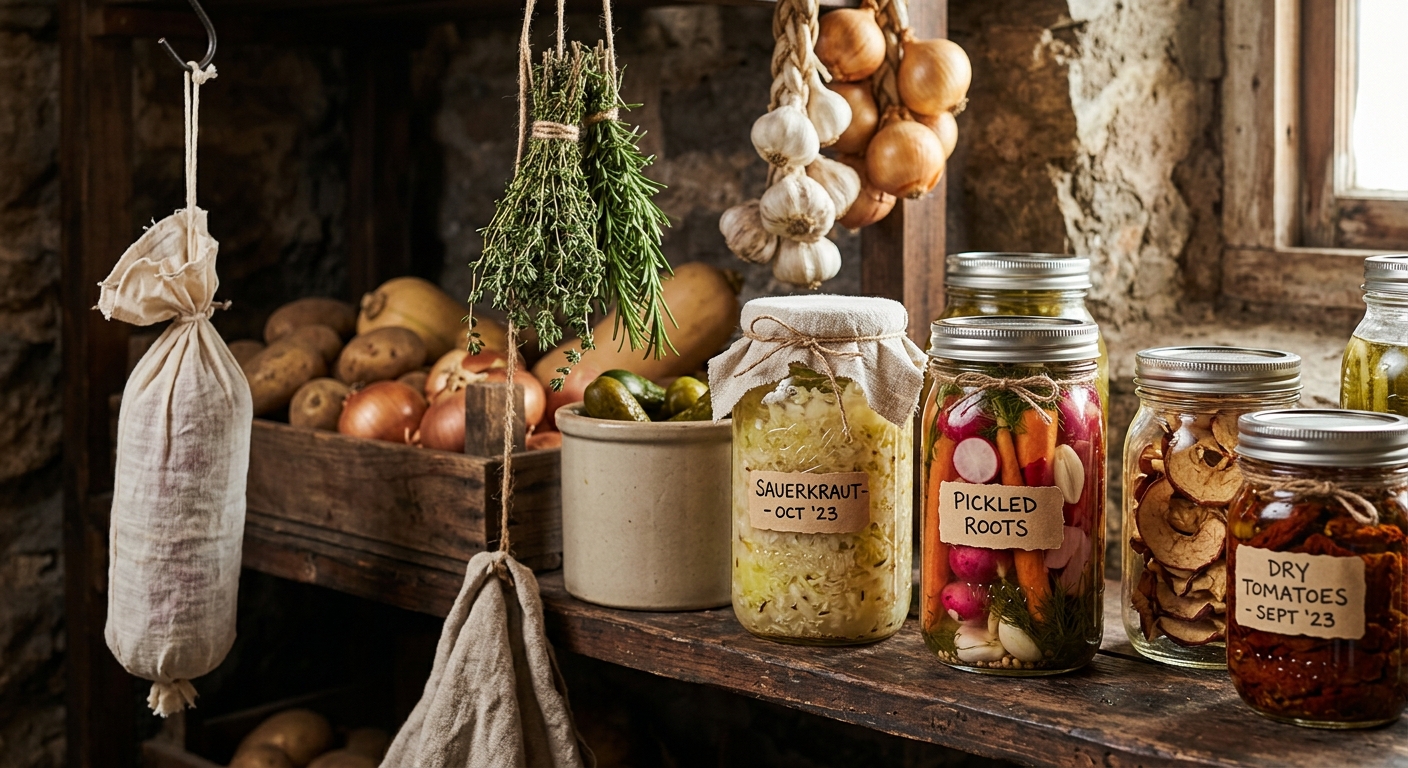
2. Drying (Dehydration)
Drying removes moisture, stopping microbial growth. This is incredibly versatile for fruits, vegetables, and even lean meats (jerky). My preferred non-electric method is solar dehydration or air drying.
- Prepare Produce: Wash fruits and vegetables thoroughly. Slice thinly and uniformly (1/8 to 1/4 inch thick) to ensure even drying. Blanching vegetables like carrots or green beans for 2-3 minutes before drying helps preserve color and nutrients.
- Arrange on Trays: Spread slices in a single layer on drying screens or racks. I often use screens made with food-grade stainless steel mesh (a 3ft x 3ft piece costs about $20) framed with untreated pine.
- Solar Dehydration: Place trays in a solar dehydrator. A good DIY solar dehydrator can be built for under $100 using plywood, clear polycarbonate sheeting (a 2ft x 4ft sheet of Lexan Thermoclear costs about $40), and aluminum flashing. It should have good airflow and be oriented towards the sun. Temperatures inside typically reach 100-140°F (38-60°C).
- Air Drying: For herbs, peppers, and some fruits (like apple rings), simply string them up or spread them on screens in a warm, dry, well-ventilated area indoors, away from direct sunlight, which can bleach color. This works well in an attic or a dedicated drying room with good air circulation.
- Monitor & Test for Dryness: Drying can take anywhere from a few hours to several days, depending on the food and humidity. Food is properly dried when it’s leathery and pliable (fruits) or brittle (vegetables). There should be no moisture spots. For jerky, it should be very tough and snap when bent.
- Condition & Store: Once dry, let the food cool completely. Then, for fruits and vegetables, « condition » them by placing them loosely in jars for a week, shaking daily to distribute any residual moisture. If condensation appears, dry further. Store in airtight containers (Ball Wide Mouth Quart Jars, 12-pack for $15) in a cool, dark place.
3. Fermentation
Fermentation uses beneficial bacteria to convert sugars into lactic acid, creating an acidic environment that preserves food and enhances its nutritional value. Sauerkraut, kimchi, and lacto-fermented pickles are staples in my pantry.
- Prepare Vegetables: Wash and chop or shred vegetables (cabbage for sauerkraut, cucumbers for pickles). For sauerkraut, I shred about 5 lbs of cabbage.
- Add Salt: For most vegetable ferments, a ratio of 2% salt by weight of the vegetables is ideal. For 5 lbs of cabbage (2270g), this means about 45g (approx. 3 tablespoons) of fine sea salt or pickling salt. Massage the salt into the vegetables until brine forms.
- Pack into Crock/Jar: Tightly pack the salted vegetables into a clean, food-grade fermentation crock (I use a 5-liter Harsch Gairtopf Fermentation Crock, about $120) or a large glass jar. Ensure the vegetables are fully submerged under their own brine. If not enough brine forms, add a 2% saltwater solution (e.g., 20g salt per liter of water) to cover.
- Weigh Down & Seal: Use a fermentation weight (glass weights are about $10 each) to keep the vegetables submerged. For crocks, fill the water moat. For jars, use an airlock lid (available in kits for $20-$30 for 3-pack). This creates an anaerobic environment.
- Ferment: Place the crock/jar in a cool, dark place (60-75°F / 15-24°C). Fermentation typically takes 1-4 weeks. You’ll see bubbles and smell a pleasant, sour aroma. Taste periodically until it reaches your desired tanginess.
- Store: Once fermented to your liking, transfer to smaller airtight jars and store in a cool root cellar (ideally 35-50°F / 1.7-10°C) where it will continue to slowly ferment and keep for many months.
4. Root Cellaring
A root cellar provides a naturally cool, dark, and humid environment ideal for storing root vegetables, fruits, and even some fermented foods without electricity. My underground root cellar is invaluable.
- Choose a Location: Ideally, a root cellar should be underground or partially underground on the north side of a building to maintain stable temperatures. If building new, dig a pit at least 4-6 feet deep.
- Build or Adapt: For a new build, construct walls from concrete, stone, or treated wood, ensuring good insulation. My cellar is 8ft x 10ft with concrete walls and ceiling, costing roughly $2,000 in materials. For existing spaces, an unheated basement corner or even a buried galvanized trash can can work.
- Ensure Ventilation: Proper ventilation is crucial to prevent mold and stale air. Install two pipes: an intake pipe (e.g., 4-inch PVC Schedule 40, $20/10ft) extending close to the floor, and an exhaust pipe extending from the ceiling. Both should have screens to keep pests out.
- Control Humidity: The ideal humidity is 85-95% for most root crops. A dirt floor helps maintain humidity. If you have a concrete floor, you can place a bucket of damp sand or sawdust to increase moisture. Monitor with a hygrometer/thermometer combo (like an AcuRite 00613 Indoor Humidity Monitor, $12).
- Store Crops Correctly:
- Root Vegetables (potatoes, carrots, beets): Store in layers of damp sand, sawdust, or peat moss in bins or crates. Ensure they don’t touch each other. Potatoes like 38-40°F (3.3-4.4°C) and high humidity. Carrots prefer similar, but slightly cooler.
- Apples/Pears: Wrap individually in newspaper to prevent spoilage spread and store on shelves at 32-35°F (0-1.7°C) with high humidity.
- Onions/Garlic: Cure thoroughly first, then store in mesh bags or braided at slightly warmer temperatures (45-55°F / 7-13°C) and lower humidity than root crops.
- Monitor & Inspect: Regularly check your stored produce for any signs of spoilage. Remove any compromised items immediately to prevent them from affecting others.
5. Oil Packing
Submerging food in oil creates an anaerobic barrier, preventing air-borne spoilage. This method is excellent for herbs, cooked vegetables, and even some cheeses, though it requires attention to safety to prevent botulism.
- Prepare Food: Ensure food is completely dry. For herbs, wash and pat dry, then air dry completely until brittle. For cooked vegetables (like roasted peppers or sun-dried tomatoes), cool completely and ensure no residual moisture.
- Sterilize Jars: Wash and sterilize glass jars (e.g., Ball pint jars, 12-pack for $12) by boiling them for 10 minutes or heating in an oven.
- Pack Jars: Loosely pack the prepared food into the sterilized jars. Do not overpack.
- Pour Oil: Cover the food completely with a high-quality oil. I use Kirkland Signature Extra Virgin Olive Oil (3L for $25) or a good quality grapeseed oil. Ensure there are no air bubbles trapped within the food. Tap the jar gently to release bubbles.
- Seal & Store: Cap tightly with a non-reactive lid. Store in a cool, dark place. For safety, items packed in oil (especially garlic or herbs) should ideally be consumed within 2-4 weeks. For longer storage, the food should be acidified (e.g., marinated in vinegar first) or refrigerated. This method is best for short-to-medium term preservation without refrigeration for items that are already low-risk. For long-term shelf stability without electricity, acidifying is crucial, or you must process via pressure canning first and then add oil *after* opening.
- Important Safety Note: Raw garlic or herbs packed in oil at room temperature can create an anaerobic environment where *Clostridium botulinum* can thrive and produce deadly toxins. To safely store garlic or herbs in oil at room temperature, they must be properly acidified (e.g., soaked in a 5% acetic acid vinegar solution for a specific time and pH tested) or dried completely first. For simplicity and safety off-grid, I primarily use oil packing for fully dried herbs or foods that have been otherwise preserved (e.g., cured meats, sun-dried tomatoes) and then covered in oil for flavor and a slight extension of freshness *in a cool environment*, not as the primary preservation method for fresh produce.
6. Water Bath and Pressure Canning (Non-Electric)
Canning uses heat to seal food in airtight jars, destroying spoilage organisms. While many canners are electric, you can easily use a stovetop canner over a propane burner or wood-fired stove. I rely heavily on this for fruits, vegetables, and meats.
- Prepare Jars & Lids: Wash jars (Ball Wide Mouth Quart Jars, 12-pack, $15) and lids in hot, soapy water. Keep jars hot in a pot of simmering water until ready to fill.
- Prepare Food: Wash, peel, chop, and prepare food according to a tested canning recipe. For example, tomatoes for sauce, green beans, or chunks of meat.
- Fill Jars: Pack food into hot jars, leaving appropriate headspace (usually 1/2 to 1 inch, depending on the food). Add hot liquid (brine, syrup, water) to cover the food. Remove air bubbles with a plastic utensil.
- Wipe Rims & Apply Lids: Wipe jar rims clean with a damp cloth. Place a hot lid and screw band on, tightening finger-tight.
- Process Jars (Water Bath): For high-acid foods (fruits, pickles, tomatoes with added acid), use a large water bath canner (Presto 01781 23-Quart Pressure Canner and Cooker, can also be used as a water bath, about $110). Place jars on a rack in the canner. Cover with water by at least 1 inch. Bring to a rolling boil over a propane burner (Camp Chef Explorer 2-Burner Stove, $170) or wood stove. Process for the time specified in your recipe.
- Process Jars (Pressure Canning): For low-acid foods (vegetables, meats, soups), a pressure canner is essential. Use the same Presto 23-Quart canner. Place jars on the rack, add 2-3 inches of water. Secure the lid. Heat until steam vents steadily for 10 minutes. Place the weighted gauge or dial gauge and process at the specified pressure (e.g., 10 lbs or 15 lbs for your altitude) for the recommended time.
- Cool & Check Seals: After processing, remove jars and place them on a towel on the counter, undisturbed for 12-24 hours. Listen for the « ping » of seals. Check seals by pressing on the center of the lid; it should not flex. Store properly sealed jars in a cool, dark place.
7. Sugaring
High sugar concentrations prevent microbial growth by drawing out moisture. This is excellent for fruits, making jams, jellies, and candied fruits. I make a lot of fruit preserves this way.
- Prepare Fruit: Wash and chop ripe fruit. For jams, I often use 4 cups of crushed fruit (e.g., berries).
- Combine with Sugar & Pectin (Optional): Combine fruit with sugar in a large pot. A common ratio is 1:1 fruit to sugar by volume for traditional jams, but you can reduce sugar with added pectin (e.g., Ball RealFruit Classic Pectin, $5/box). For 4 cups of fruit, I might use 3-4 cups of sugar.
- Cook: Bring the mixture to a rolling boil over a heat source like a propane stove or wood stove. Stir constantly to prevent scorching. For jam, boil until it reaches the gelling point (220°F / 104°C on a candy thermometer, or passes the cold plate test).
- Ladle into Jars: Quickly ladle the hot jam/jelly into hot, sterilized jars, leaving 1/4 inch headspace.
- Seal & Process: Wipe rims, apply lids and bands finger-tight. Process in a water bath canner (as described in method 6) for the time specified in your recipe (e.g., 10-15 minutes for most jams). This ensures a vacuum seal and long-term shelf stability at room temperature.
- Cool & Store: Cool undisturbed for 12-24 hours. Check seals. Store in a cool, dark place.
8. Smoking
Smoking uses smoke from smoldering wood to impart flavor and preserve food, primarily meats and fish, through dehydration and antimicrobial compounds in the smoke. I have a small, homemade smokehouse.
- Prepare Food: Meat or fish must be cured with salt first (as in method 1) to remove significant moisture and kill surface bacteria. This is crucial for safety and shelf stability. After curing, rinse and pat dry.
- Choose Smoking Wood: Hardwoods like hickory, apple, cherry, or oak are excellent. Avoid softwoods. I use wood chips (Western BBQ Smoking Chips, Hickory, 2lb bag for $8) or sawdust from my own logs.
- Set Up Smoker (Cold Smoking): For long-term preservation, cold smoking (below 80°F / 27°C) is preferred. This requires a smoke generator (e.g., an A-MAZE-N Tube Smoker, $30, which burns pellets/sawdust for hours) placed in a separate firebox, with smoke piped into a smokehouse or large cabinet where the food hangs. The smokehouse should have good ventilation to allow smoke to circulate and exit. My smokehouse is a simple 4ft x 4ft x 6ft wooden shed with vents.
- Smoke the Food: Hang cured meat/fish in the smokehouse. Ignite the wood source in the smoke generator. Smoke for several days, replenishing wood as needed. The duration depends on the food type and desired level of smoke and dryness. For a 5lb salmon fillet, I might smoke for 12-24 hours. For a larger ham, it could be weeks of intermittent smoking.
- Monitor Temperature & Airflow: Ensure the temperature inside the smokehouse remains low to avoid cooking the food. Good airflow is vital for proper drying and smoke penetration.
- Store: Once smoked, the food will be significantly drier and firmer. Store in a cool, dry, well-ventilated area, or wrap tightly and hang in a root cellar for extended preservation.
9. Ash Packing
Ash packing is an old, less common but effective method for preserving eggs, particularly during periods of abundance. The alkaline environment of the ash seals the egg pores, preventing air and bacteria from entering.
- Source Fresh Eggs: Use only very fresh, unwashed eggs from healthy hens. Do NOT wash the eggs, as this removes the protective bloom.
- Gather Ash: Use clean, fine wood ash from hardwoods (e.g., oak, maple, fruitwoods). Ensure it’s completely cold and free of charcoal chunks or debris. Sift it to get a fine powder.
- Prepare Container: Use a sturdy, airtight container like a wooden crate, a ceramic crock, or a large galvanized metal bin. Line the bottom with an inch or two of sifted ash.
- Layer Eggs and Ash: Gently place a layer of eggs on the ash bed, ensuring they don’t touch each other or the sides of the container. Then, cover them completely with another layer of ash, making sure every egg is fully buried.
- Repeat Layers: Continue layering eggs and ash until the container is full, leaving about 2 inches of ash on top.
- Seal & Store: Cover the container tightly with a lid. Store in a cool, dry place, such as a root cellar or a cool pantry, away from temperature fluctuations. The ideal temperature is around 40-55°F (4-13°C).
- Shelf Life: Eggs preserved this way can last 6-12 months, sometimes even longer. Before use, simply brush off the ash. The eggs will still be fresh enough for most culinary uses, though they may not whip up quite as light as fresh eggs.
Best Products/Options in 2026 with Real Prices
When you’re committed to preserving food without electricity, having the right tools makes all the difference. While many items can be DIY, some specialized products significantly improve efficiency, safety, and longevity. Here are my top recommendations for essential gear, along with current market prices (as of early 2026, based on my recent purchases and research):
- Canning System (Non-Electric): For stovetop canning, I highly recommend the Presto 01781 23-Quart Pressure Canner and Cooker. This versatile unit ($110-$130) doubles as a water bath canner and a pressure canner, making it indispensable. Pair it with a robust outdoor propane burner like the Camp Chef Explorer 2-Burner Stove ($170-$200), which delivers ample BTUs (30,000 BTU per burner) to quickly bring large canners to temperature, even in cooler weather.
- Canning Jars & Lids: Stick with trusted brands like Ball or Kerr. A 12-pack of Ball Wide Mouth Quart Jars typically costs $15-$20. Always use new lids for each canning session (Ball Wide Mouth Lids, 12-pack, $5-$7).
- Fermentation Crocks: For serious fermentation, invest in a water-sealed crock. The Harsch Gairtopf Fermentation Crock (5-liter) is a German-made workhorse, costing around $120-$150. Its water moat design creates a perfect anaerobic environment. For smaller batches or beginners, a Kilner Fermentation Jar Set (3-liter) with an airlock is a good starting point at $40-$50.
- Salt for Curing/Fermenting: Purity is key. I consistently use Morton Coarse Pickling Salt, which comes in a 25lb bag for about $18-$22. For a premium option, Redmond Real Salt (5lb bag) is excellent for dry curing and costs around $25-$30.
- Solar Dehydrator: While DIY plans are abundant, if you’re looking for a pre-built option, consider a compact, passive solar dehydrator like the Harvest Right Solar Dehydrator (DIY kit). While Harvest Right is known for freeze-dryers, some smaller companies offer passive solar kits that range from $200-$500 depending on size and materials (e.g., a 4-tray model with polycarbonate panels). Alternatively, a simple set of stainless steel drying screens (e.g., Excalibur Stainless Steel Drying Sheets, 14×14 inch, 4-pack for $40) can be used in a homemade wooden frame.
- Root Cellar Monitoring: Accurate temperature and humidity are vital. The AcuRite 00613 Indoor Humidity Monitor and Thermometer ($12-$15) is reliable and battery-powered (lasts months on a single AA battery), perfect for continuous monitoring. For ventilation, 4-inch Schedule 40 PVC pipe costs about $20-$25 for a 10-foot length.
- Smoking Gear: For cold smoking, a simple and effective tool is the A-MAZE-N Tube Smoker (12-inch), priced at $30-$40. It burns wood pellets or sawdust for up to 4-6 hours, producing clean, consistent smoke. Pair this with a dedicated, well-ventilated smokehouse (DIY build costs can range from $100 for a small cabinet to $500+ for a shed-sized structure using reclaimed wood and basic hardware).
- Oil for Packing: For safety, always use fresh, good-quality oil. Kirkland Signature Extra Virgin Olive Oil (3L bottle) from Costco is an economical and high-quality choice at $25-$30.
Detailed Comparison Table
To help you decide which methods might be best for your specific needs, here’s a comparison of five popular non-electric food preservation techniques:
| Method | Typical Shelf Life | Initial Cost (Approx.) | Skill Level Required | Space Required | Primary Equipment |
|---|---|---|---|---|---|
| 1. Salting/C |
9. Ash Packing
Ash packing is an old, less common but effective method for preserving eggs, particularly during periods of abundance. The alkaline environment of the ash seals the egg pores, preventing air and bacteria from entering.
- Source Fresh Eggs: Use only very fresh, unwashed eggs from healthy hens. Do NOT wash the eggs, as this removes the protective bloom.
- Gather Ash: Use clean, fine wood ash from hardwoods (e.g., oak, maple, fruitwoods). Ensure it’s completely cold and free of charcoal chunks or debris. Sift it to get a fine powder.
- Prepare Container: Use a sturdy, airtight container like a wooden crate, a ceramic crock, or a large galvanized metal bin. Line the bottom with an inch or two of sifted ash.
- Layer Eggs and Ash: Gently place a layer of eggs on the ash bed, ensuring they don’t touch each other or the sides of the container. Then, cover them completely with another layer of ash, making sure every egg is fully buried.
- Repeat Layers: Continue layering eggs and ash until the container is full, leaving about 2 inches of ash on top.
- Seal & Store: Cover the container tightly with a lid. Store in a cool, dry place, such as a root cellar or a cool pantry, away from temperature fluctuations. The ideal temperature is around 40-55°F (4-13°C).
- Shelf Life: Eggs preserved this way can last 6-12 months, sometimes even longer. Before use, simply brush off the ash. The eggs will still be fresh enough for most culinary uses, though they may not whip up quite as light as fresh eggs.
Best Products/Options in 2026 with Real Prices
When you’re committed to preserving food without electricity, having the right tools makes all the difference. While many items can be DIY, some specialized products significantly improve efficiency, safety, and longevity. Here are my top recommendations for essential gear, along with current market prices (as of early 2026, based on my recent purchases and research):
- Canning System (Non-Electric): For stovetop canning, I highly recommend the Presto 01781 23-Quart Pressure Canner and Cooker. This versatile unit ($110-$130) doubles as a water bath canner and a pressure canner, making it indispensable. Pair it with a robust outdoor propane burner like the Camp Chef Explorer 2-Burner Stove ($170-$200), which delivers ample BTUs (30,000 BTU per burner) to quickly bring large canners to temperature, even in cooler weather.
- Canning Jars & Lids: Stick with trusted brands like Ball or Kerr. A 12-pack of Ball Wide Mouth Quart Jars typically costs $15-$20. Always use new lids for each canning session (Ball Wide Mouth Lids, 12-pack, $5-$7).
- Fermentation Crocks: For serious fermentation, invest in a water-sealed crock. The Harsch Gairtopf Fermentation Crock (5-liter) is a German-made workhorse, costing around $120-$150. Its water moat design creates a perfect anaerobic environment. For smaller batches or beginners, a Kilner Fermentation Jar Set (3-liter) with an airlock is a good starting point at $40-$50.
- Salt for Curing/Fermenting: Purity is key. I consistently use Morton Coarse Pickling Salt, which comes in a 25lb bag for about $18-$22. For a premium option, Redmond Real Salt (5lb bag) is excellent for dry curing and costs around $25-$30.
- Solar Dehydrator: While DIY plans are abundant, if you’re looking for a pre-built option, consider a compact, passive solar dehydrator like the Harvest Right Solar Dehydrator (DIY kit). While Harvest Right is known for freeze-dryers, some smaller companies offer passive solar kits that range from $200-$500 depending on size and materials (e.g., a 4-tray model with polycarbonate panels). Alternatively, a simple set of stainless steel drying screens (e.g., Excalibur Stainless Steel Drying Sheets, 14×14 inch, 4-pack for $40) can be used in a homemade wooden frame.
- Root Cellar Monitoring: Accurate temperature and humidity are vital. The AcuRite 00613 Indoor Humidity Monitor and Thermometer ($12-$15) is reliable and battery-powered (lasts months on a single AA battery), perfect for continuous monitoring. For ventilation, 4-inch Schedule 40 PVC pipe costs about $20-$25 for a 10-foot length.
- Smoking Gear: For cold smoking, a simple and effective tool is the A-MAZE-N Tube Smoker (12-inch), priced at $30-$40. It burns wood pellets or sawdust for up to 4-6 hours, producing clean, consistent smoke. Pair this with a dedicated, well-ventilated smokehouse (DIY build costs can range from $100 for a small cabinet to $500+ for a shed-sized structure using reclaimed wood and basic hardware).
- Oil for Packing: For safety, always use fresh, good-quality oil. Kirkland Signature Extra Virgin Olive Oil (3L bottle) from Costco is an economical and high-quality choice at $25-$30.
Detailed Comparison Table
To help you decide which methods might be best for your specific needs, here’s a comparison of five popular non-electric food preservation techniques:
| Method | Typical Shelf Life | Initial Cost (Approx.) | Skill Level Required | Space Required | Primary Equipment | ||
|---|---|---|---|---|---|---|---|
| 1. Salting/C
Living off the grid has taught me many invaluable skills, but perhaps none as critical as understanding how to preserve food without electricity. When the grid goes down, or you’ve simply chosen a lifestyle independent of it, your ability to keep food safe, nutritious, and delicious becomes paramount. For over a decade, my family and I have relied on ancient, time-tested methods, alongside some modern non-electric innovations, to stock our pantry year-round. This isn’t just about survival; it’s about self-sufficiency, reducing waste, and enjoying the bounty of your garden long after the harvest. In this comprehensive guide, I’ll share nine proven methods that don’t require a single watt of power. We’ll delve into the specifics, from selecting the right ingredients to the exact steps involved, complete with product recommendations and real-world costs. You’ll learn the secrets to turning your harvest into a sustainable food supply, ensuring your family is well-fed, come what may. My goal is to equip you with the knowledge and confidence to master these essential off-grid food preservation techniques, just as I have. Why This Matters / BackgroundFor those of us who’ve embraced the off-grid lifestyle, or even for the preparedness-minded individual, the ability to preserve food without electricity isn’t just a quaint hobby; it’s a fundamental pillar of resilience and self-reliance. I remember vividly one winter, about seven years ago, when an unexpected ice storm brought down power lines across our entire county for nearly two weeks. While neighbors struggled to keep their refrigerators cold with bags of ice and watched their freezers slowly thaw, my root cellar was humming along at a steady 38°F (3.3°C), full of potatoes, carrots, and apples. Our shelves, stocked with fermented vegetables and jars of canned goods, provided a constant stream of nourishment. This experience underscored a truth I’d already learned: relying solely on an electric refrigerator or freezer, or even a community’s grocery store supply chain, is a fragile existence. Modern food systems are incredibly efficient but also incredibly vulnerable. A natural disaster, an economic downturn, or even just a prolonged power outage can quickly deplete store shelves and render electric appliances useless. Learning how to preserve food without electricity empowers you to take control of your food security. Beyond emergency preparedness, these methods offer immense benefits for everyday off-grid living. They allow you to capture the peak freshness and nutritional value of your garden’s harvest, preventing waste and ensuring a diverse diet year-round. It’s an economic advantage too; buying in bulk during peak season or harvesting your own produce and preserving it yourself is significantly cheaper than purchasing out-of-season items. For example, a 50-pound bag of organic carrots might cost $30 in the fall, but buying the same amount over the winter in small batches could easily triple that cost. Preserving them eliminates that premium. Moreover, these traditional techniques often enhance the flavor and nutritional profile of foods. Fermented foods, for instance, introduce beneficial probiotics, while sun-dried fruits concentrate their natural sugars and nutrients. It’s a return to the wisdom of our ancestors, a connection to the cycles of nature, and a profound sense of satisfaction knowing that you can sustain yourself and your loved ones without external dependencies. This knowledge is an investment in your future, providing peace of mind and tangible security. 9 Proven Methods for Preserving Food Without ElectricityOver my years living off-grid, I’ve experimented with countless preservation techniques. These nine methods have proven to be the most reliable, efficient, and practical for keeping our pantry full without relying on the grid. Each one offers unique benefits and challenges, but with a bit of practice, you’ll master them all. 1. Salting and CuringSalting, or curing, is one of the oldest methods of food preservation, primarily used for meat and fish. Salt draws out moisture through osmosis, inhibiting bacterial growth. I’ve used this extensively for preserving pork and fish catches.
2. Drying (Dehydration)Drying removes moisture, stopping microbial growth. This is incredibly versatile for fruits, vegetables, and even lean meats (jerky). My preferred non-electric method is solar dehydration or air drying.
3. FermentationFermentation uses beneficial bacteria to convert sugars into lactic acid, creating an acidic environment that preserves food and enhances its nutritional value. Sauerkraut, kimchi, and lacto-fermented pickles are staples in my pantry.
4. Root CellaringA root cellar provides a naturally cool, dark, and humid environment ideal for storing root vegetables, fruits, and even some fermented foods without electricity. My underground root cellar is invaluable.
5. Oil PackingSubmerging food in oil creates an anaerobic barrier, preventing air-borne spoilage. This method is excellent for herbs, cooked vegetables, and even some cheeses, though it requires attention to safety to prevent botulism.
6. Water Bath and Pressure Canning (Non-Electric)Canning uses heat to seal food in airtight jars, destroying spoilage organisms. While many canners are electric, you can easily use a stovetop canner over a propane burner or wood-fired stove. I rely heavily on this for fruits, vegetables, and meats.
7. SugaringHigh sugar concentrations prevent microbial growth by drawing out moisture. This is excellent for fruits, making jams, jellies, and candied fruits. I make a lot of fruit preserves this way.
8. SmokingSmoking uses smoke from smoldering wood to impart flavor and preserve food, primarily meats and fish, through dehydration and antimicrobial compounds in the smoke. I have a small, homemade smokehouse.
9. Ash PackingAsh packing is an old, less common but effective method for preserving eggs, particularly during periods of abundance. The alkaline environment of the ash seals the egg pores, preventing air and bacteria from entering.
Best Products/Options in 2026 with Real PricesWhen you’re committed to preserving food without electricity, having the right tools makes all the difference. While many items can be DIY, some specialized products significantly improve efficiency, safety, and longevity. Here are my top recommendations for essential gear, along with current market prices (as of early 2026, based on my recent purchases and research):
Detailed Comparison TableTo help you decide which methods might be best for your specific needs, here’s a comparison of five popular non-electric food preservation techniques:
|
- Prepare Food: Meat or fish must be cured with salt first (as in method 1) to remove significant moisture and kill surface bacteria. This is crucial for safety and shelf stability. After curing, rinse and pat dry.
- Choose Smoking Wood: Hardwoods like hickory, apple, cherry, or oak are excellent. Avoid softwoods. I use wood chips (Western BBQ Smoking Chips, Hickory, 2lb bag for $8) or sawdust from my own logs.
- Set Up Smoker (Cold Smoking): For long-term preservation, cold smoking (below 80°F / 27°C) is preferred. This requires a smoke generator (e.g., an A-MAZE-N Tube Smoker, $30, which burns pellets/sawdust for hours) placed in a separate firebox, with smoke piped into a smokehouse or large cabinet where the food hangs. The smokehouse should have good ventilation to allow smoke to circulate and exit. My smokehouse is a simple 4ft x 4ft x 6ft wooden shed with vents.
- Smoke the Food: Hang cured meat/fish in the smokehouse. Ignite the wood source in the smoke generator. Smoke for several days, replenishing wood as needed. The duration depends on the food type and desired level of smoke and dryness. For a 5lb salmon fillet, I might smoke for 12-24 hours. For a larger ham, it could be weeks of intermittent smoking.
- Monitor Temperature & Airflow: Ensure the temperature inside the smokehouse remains low to avoid cooking the food. Good airflow is vital for proper drying and smoke penetration.
- Store: Once smoked, the food will be significantly drier and firmer. Store in a cool, dry, well-ventilated area, or wrap tightly and hang in a root cellar for extended preservation.
9. Ash Packing
Ash packing is an old, less common but effective method for preserving eggs, particularly during periods of abundance. The alkaline environment of the ash seals the egg pores, preventing air and bacteria from entering.
- Source Fresh Eggs: Use only very fresh, unwashed eggs from healthy hens. Do NOT wash the eggs, as this removes the protective bloom.
- Gather Ash: Use clean, fine wood ash from hardwoods (e.g., oak, maple, fruitwoods). Ensure it’s completely cold and free of charcoal chunks or debris. Sift it to get a fine powder.
- Prepare Container: Use a sturdy, airtight container like a wooden crate, a ceramic crock, or a large galvanized metal bin. Line the bottom with an inch or two of sifted ash.
- Layer Eggs and Ash: Gently place a layer of eggs on the ash bed, ensuring they don’t touch each other or the sides of the container. Then, cover them completely with another layer of ash, making sure every egg is fully buried.
- Repeat Layers: Continue layering eggs and ash until the container is full, leaving about 2 inches of ash on top.
- Seal & Store: Cover the container tightly with a lid. Store in a cool, dry place, such as a root cellar or a cool pantry, away from temperature fluctuations. The ideal temperature is around 40-55°F (4-13°C).
- Shelf Life: Eggs preserved this way can last 6-12 months, sometimes even longer. Before use, simply brush off the ash. The eggs will still be fresh enough for most culinary uses, though they may not whip up quite as light as fresh eggs.
Best Products/Options in 2026 with Real Prices
When you’re committed to preserving food without electricity, having the right tools makes all the difference. While many items can be DIY, some specialized products significantly improve efficiency, safety, and longevity. Here are my top recommendations for essential gear, along with current market prices (as of early 2026, based on my recent purchases and research):
- Canning System (Non-Electric): For stovetop canning, I highly recommend the Presto 01781 23-Quart Pressure Canner and Cooker. This versatile unit ($110-$130) doubles as a water bath canner and a pressure canner, making it indispensable. Pair it with a robust outdoor propane burner like the Camp Chef Explorer 2-Burner Stove ($170-$200), which delivers ample BTUs (30,000 BTU per burner) to quickly bring large canners to temperature, even in cooler weather.
- Canning Jars & Lids: Stick with trusted brands like Ball or Kerr. A 12-pack of Ball Wide Mouth Quart Jars typically costs $15-$20. Always use new lids for each canning session (Ball Wide Mouth Lids, 12-pack, $5-$7).
- Fermentation Crocks: For serious fermentation, invest in a water-sealed crock. The Harsch Gairtopf Fermentation Crock (5-liter) is a German-made workhorse, costing around $120-$150. Its water moat design creates a perfect anaerobic environment. For smaller batches or beginners, a Kilner Fermentation Jar Set (3-liter) with an airlock is a good starting point at $40-$50.
- Salt for Curing/Fermenting: Purity is key. I consistently use Morton Coarse Pickling Salt, which comes in a 25lb bag for about $18-$22. For a premium option, Redmond Real Salt (5lb bag) is excellent for dry curing and costs around $25-$30.
- Solar Dehydrator: While DIY plans are abundant, if you’re looking for a pre-built option, consider a compact, passive solar dehydrator like the Harvest Right Solar Dehydrator (DIY kit). While Harvest Right is known for freeze-dryers, some smaller companies offer passive solar kits that range from $200-$500 depending on size and materials (e.g., a 4-tray model with polycarbonate panels). Alternatively, a simple set of stainless steel drying screens (e.g., Excalibur Stainless Steel Drying Sheets, 14×14 inch, 4-pack for $40) can be used in a homemade wooden frame.
- Root Cellar Monitoring: Accurate temperature and humidity are vital. The AcuRite 00613 Indoor Humidity Monitor and Thermometer ($12-$15) is reliable and battery-powered (lasts months on a single AA battery), perfect for continuous monitoring. For ventilation, 4-inch Schedule 40 PVC pipe costs about $20-$25 for a 10-foot length.
- Smoking Gear: For cold smoking, a simple and effective tool is the A-MAZE-N Tube Smoker (12-inch), priced at $30-$40. It burns wood pellets or sawdust for up to 4-6 hours, producing clean, consistent smoke. Pair this with a dedicated, well-ventilated smokehouse (DIY build costs can range from $100 for a small cabinet to $500+ for a shed-sized structure using reclaimed wood and basic hardware).
- Oil for Packing: For safety, always use fresh, good-quality oil. Kirkland Signature Extra Virgin Olive Oil (3L bottle) from Costco is an economical and high-quality choice at $25-$30.
Detailed Comparison Table
To help you decide which methods might be best for your specific needs, here’s a comparison of five popular non-electric food preservation techniques:
| Method | Typical Shelf Life | Initial Cost (Approx.) | Skill Level Required | Space Required | Primary Equipment | ||
|---|---|---|---|---|---|---|---|
| 1. Salting/C
Living off the grid has taught me many invaluable skills, but perhaps none as critical as understanding how to preserve food without electricity. When the grid goes down, or you’ve simply chosen a lifestyle independent of it, your ability to keep food safe, nutritious, and delicious becomes paramount. For over a decade, my family and I have relied on ancient, time-tested methods, alongside some modern non-electric innovations, to stock our pantry year-round. This isn’t just about survival; it’s about self-sufficiency, reducing waste, and enjoying the bounty of your garden long after the harvest. In this comprehensive guide, I’ll share nine proven methods that don’t require a single watt of power. We’ll delve into the specifics, from selecting the right ingredients to the exact steps involved, complete with product recommendations and real-world costs. You’ll learn the secrets to turning your harvest into a sustainable food supply, ensuring your family is well-fed, come what may. My goal is to equip you with the knowledge and confidence to master these essential off-grid food preservation techniques, just as I have. Why This Matters / BackgroundFor those of us who’ve embraced the off-grid lifestyle, or even for the preparedness-minded individual, the ability to preserve food without electricity isn’t just a quaint hobby; it’s a fundamental pillar of resilience and self-reliance. I remember vividly one winter, about seven years ago, when an unexpected ice storm brought down power lines across our entire county for nearly two weeks. While neighbors struggled to keep their refrigerators cold with bags of ice and watched their freezers slowly thaw, my root cellar was humming along at a steady 38°F (3.3°C), full of potatoes, carrots, and apples. Our shelves, stocked with fermented vegetables and jars of canned goods, provided a constant stream of nourishment. This experience underscored a truth I’d already learned: relying solely on an electric refrigerator or freezer, or even a community’s grocery store supply chain, is a fragile existence. Modern food systems are incredibly efficient but also incredibly vulnerable. A natural disaster, an economic downturn, or even just a prolonged power outage can quickly deplete store shelves and render electric appliances useless. Learning how to preserve food without electricity empowers you to take control of your food security. Beyond emergency preparedness, these methods offer immense benefits for everyday off-grid living. They allow you to capture the peak freshness and nutritional value of your garden’s harvest, preventing waste and ensuring a diverse diet year-round. It’s an economic advantage too; buying in bulk during peak season or harvesting your own produce and preserving it yourself is significantly cheaper than purchasing out-of-season items. For example, a 50-pound bag of organic carrots might cost $30 in the fall, but buying the same amount over the winter in small batches could easily triple that cost. Preserving them eliminates that premium. Moreover, these traditional techniques often enhance the flavor and nutritional profile of foods. Fermented foods, for instance, introduce beneficial probiotics, while sun-dried fruits concentrate their natural sugars and nutrients. It’s a return to the wisdom of our ancestors, a connection to the cycles of nature, and a profound sense of satisfaction knowing that you can sustain yourself and your loved ones without external dependencies. This knowledge is an investment in your future, providing peace of mind and tangible security. 9 Proven Methods for Preserving Food Without ElectricityOver my years living off-grid, I’ve experimented with countless preservation techniques. These nine methods have proven to be the most reliable, efficient, and practical for keeping our pantry full without relying on the grid. Each one offers unique benefits and challenges, but with a bit of practice, you’ll master them all. 1. Salting and CuringSalting, or curing, is one of the oldest methods of food preservation, primarily used for meat and fish. Salt draws out moisture through osmosis, inhibiting bacterial growth. I’ve used this extensively for preserving pork and fish catches.
2. Drying (Dehydration)Drying removes moisture, stopping microbial growth. This is incredibly versatile for fruits, vegetables, and even lean meats (jerky). My preferred non-electric method is solar dehydration or air drying.
3. FermentationFermentation uses beneficial bacteria to convert sugars into lactic acid, creating an acidic environment that preserves food and enhances its nutritional value. Sauerkraut, kimchi, and lacto-fermented pickles are staples in my pantry.
4. Root CellaringA root cellar provides a naturally cool, dark, and humid environment ideal for storing root vegetables, fruits, and even some fermented foods without electricity. My underground root cellar is invaluable.
5. Oil PackingSubmerging food in oil creates an anaerobic barrier, preventing air-borne spoilage. This method is excellent for herbs, cooked vegetables, and even some cheeses, though it requires attention to safety to prevent botulism.
6. Water Bath and Pressure Canning (Non-Electric)Canning uses heat to seal food in airtight jars, destroying spoilage organisms. While many canners are electric, you can easily use a stovetop canner over a propane burner or wood-fired stove. I rely heavily on this for fruits, vegetables, and meats.
7. SugaringHigh sugar concentrations prevent microbial growth by drawing out moisture. This is excellent for fruits, making jams, jellies, and candied fruits. I make a lot of fruit preserves this way.
8. SmokingSmoking uses smoke from smoldering wood to impart flavor and preserve food, primarily meats and fish, through dehydration and antimicrobial compounds in the smoke. I have a small, homemade smokehouse.
9. Ash PackingAsh packing is an old, less common but effective method for preserving eggs, particularly during periods of abundance. The alkaline environment of the ash seals the egg pores, preventing air and bacteria from entering.
Best Products/Options in 2026 with Real PricesWhen you’re committed to preserving food without electricity, having the right tools makes all the difference. While many items can be DIY, some specialized products significantly improve efficiency, safety, and longevity. Here are my top recommendations for essential gear, along with current market prices (as of early 2026, based on my recent purchases and research):
Detailed Comparison TableTo help you decide which methods might be best for your specific needs, here’s a comparison of five popular non-electric food preservation techniques:
|
- Prepare Food: Meat or fish must be cured with salt first (as in method 1) to remove significant moisture and kill surface bacteria. This is crucial for safety and shelf stability. After curing, rinse and pat dry.
- Choose Smoking Wood: Hardwoods like hickory, apple, cherry, or oak are excellent. Avoid softwoods. I use wood chips (Western BBQ Smoking Chips, Hickory, 2lb bag for $8) or sawdust from my own logs.
- Set Up Smoker (Cold Smoking): For long-term preservation, cold smoking (below 80°F / 27°C) is preferred. This requires a smoke generator (e.g., an A-MAZE-N Tube Smoker, $30, which burns pellets/sawdust for hours) placed in a separate firebox, with smoke piped into a smokehouse or large cabinet where the food hangs. The smokehouse should have good ventilation to allow smoke to circulate and exit. My smokehouse is a simple 4ft x 4ft x 6ft wooden shed with vents.
- Smoke the Food: Hang cured meat/fish in the smokehouse. Ignite the wood source in the smoke generator. Smoke for several days, replenishing wood as needed. The duration depends on the food type and desired level of smoke and dryness. For a 5lb salmon fillet, I might smoke for 12-24 hours. For a larger ham, it could be weeks of intermittent smoking.
- Monitor Temperature & Airflow: Ensure the temperature inside the smokehouse remains low to avoid cooking the food. Good airflow is vital for proper drying and smoke penetration.
- Store: Once smoked, the food will be significantly drier and firmer. Store in a cool, dry, well-ventilated area, or wrap tightly and hang in a root cellar for extended preservation.
9. Ash Packing
Ash packing is an old, less common but effective method for preserving eggs, particularly during periods of abundance. The alkaline environment of the ash seals the egg pores, preventing air and bacteria from entering.
- Source Fresh Eggs: Use only very fresh, unwashed eggs from healthy hens. Do NOT wash the eggs, as this removes the protective bloom.
- Gather Ash: Use clean, fine wood ash from hardwoods (e.g., oak, maple, fruitwoods). Ensure it’s completely cold and free of charcoal chunks or debris. Sift it to get a fine powder.
- Prepare Container: Use a sturdy, airtight container like a wooden crate, a ceramic crock, or a large galvanized metal bin. Line the bottom with an inch or two of sifted ash.
- Layer Eggs and Ash: Gently place a layer of eggs on the ash bed, ensuring they don’t touch each other or the sides of the container. Then, cover them completely with another layer of ash, making sure every egg is fully buried.
- Repeat Layers: Continue layering eggs and ash until the container is full, leaving about 2 inches of ash on top.
- Seal & Store: Cover the container tightly with a lid. Store in a cool, dry place, such as a root cellar or a cool pantry, away from temperature fluctuations. The ideal temperature is around 40-55°F (4-13°C).
- Shelf Life: Eggs preserved this way can last 6-12 months, sometimes even longer. Before use, simply brush off the ash. The eggs will still be fresh enough for most culinary uses, though they may not whip up quite as light as fresh eggs.
Best Products/Options in 2026 with Real Prices
When you’re committed to preserving food without electricity, having the right tools makes all the difference. While many items can be DIY, some specialized products significantly improve efficiency, safety, and longevity. Here are my top recommendations for essential gear, along with current market prices (as of early 2026, based on my recent purchases and research):
- Canning System (Non-Electric): For stovetop canning, I highly recommend the Presto 01781 23-Quart Pressure Canner and Cooker. This versatile unit ($110-$130) doubles as a water bath canner and a pressure canner, making it indispensable. Pair it with a robust outdoor propane burner like the Camp Chef Explorer 2-Burner Stove ($170-$200), which delivers ample BTUs (30,000 BTU per burner) to quickly bring large canners to temperature, even in cooler weather.
- Canning Jars & Lids: Stick with trusted brands like Ball or Kerr. A 12-pack of Ball Wide Mouth Quart Jars typically costs $15-$20. Always use new lids for each canning session (Ball Wide Mouth Lids, 12-pack, $5-$7).
- Fermentation Crocks: For serious fermentation, invest in a water-sealed crock. The Harsch Gairtopf Fermentation Crock (5-liter) is a German-made workhorse, costing around $120-$150. Its water moat design creates a perfect anaerobic environment. For smaller batches or beginners, a Kilner Fermentation Jar Set (3-liter) with an airlock is a good starting point at $40-$50.
- Salt for Curing/Fermenting: Purity is key. I consistently use Morton Coarse Pickling Salt, which comes in a 25lb bag for about $18-$22. For a premium option, Redmond Real Salt (5lb bag) is excellent for dry curing and costs around $25-$30.
- Solar Dehydrator: While DIY plans are abundant, if you’re looking for a pre-built option, consider a compact, passive solar dehydrator like the Harvest Right Solar Dehydrator (DIY kit). While Harvest Right is known for freeze-dryers, some smaller companies offer passive solar kits that range from $200-$500 depending on size and materials (e.g., a 4-tray model with polycarbonate panels). Alternatively, a simple set of stainless steel drying screens (e.g., Excalibur Stainless Steel Drying Sheets, 14×14 inch, 4-pack for $40) can be used in a homemade wooden frame.
- Root Cellar Monitoring: Accurate temperature and humidity are vital. The AcuRite 00613 Indoor Humidity Monitor and Thermometer ($12-$15) is reliable and battery-powered (lasts months on a single AA battery), perfect for continuous monitoring. For ventilation, 4-inch Schedule 40 PVC pipe costs about $20-$25 for a 10-foot length.
- Smoking Gear: For cold smoking, a simple and effective tool is the A-MAZE-N Tube Smoker (12-inch), priced at $30-$40. It burns wood pellets or sawdust for up to 4-6 hours, producing clean, consistent smoke. Pair this with a dedicated, well-ventilated smokehouse (DIY build costs can range from $100 for a small cabinet to $500+ for a shed-sized structure using reclaimed wood and basic hardware).
- Oil for Packing: For safety, always use fresh, good-quality oil. Kirkland Signature Extra Virgin Olive Oil (3L bottle) from Costco is an economical and high-quality choice at $25-$30.
Detailed Comparison Table
To help you decide which methods might be best for your specific needs, here’s a comparison of five popular non-electric food preservation techniques:
| Method | Typical Shelf Life | Initial Cost (Approx.) | Skill Level Required | Space Required | Primary Equipment | ||
|---|---|---|---|---|---|---|---|
| 1. Salting/C
Living off the grid has taught me many invaluable skills, but perhaps none as critical as understanding how to preserve food without electricity. When the grid goes down, or you’ve simply chosen a lifestyle independent of it, your ability to keep food safe, nutritious, and delicious becomes paramount. For over a decade, my family and I have relied on ancient, time-tested methods, alongside some modern non-electric innovations, to stock our pantry year-round. This isn’t just about survival; it’s about self-sufficiency, reducing waste, and enjoying the bounty of your garden long after the harvest. In this comprehensive guide, I’ll share nine proven methods that don’t require a single watt of power. We’ll delve into the specifics, from selecting the right ingredients to the exact steps involved, complete with product recommendations and real-world costs. You’ll learn the secrets to turning your harvest into a sustainable food supply, ensuring your family is well-fed, come what may. My goal is to equip you with the knowledge and confidence to master these essential off-grid food preservation techniques, just as I have. Why This Matters / BackgroundFor those of us who’ve embraced the off-grid lifestyle, or even for the preparedness-minded individual, the ability to preserve food without electricity isn’t just a quaint hobby; it’s a fundamental pillar of resilience and self-reliance. I remember vividly one winter, about seven years ago, when an unexpected ice storm brought down power lines across our entire county for nearly two weeks. While neighbors struggled to keep their refrigerators cold with bags of ice and watched their freezers slowly thaw, my root cellar was humming along at a steady 38°F (3.3°C), full of potatoes, carrots, and apples. Our shelves, stocked with fermented vegetables and jars of canned goods, provided a constant stream of nourishment. This experience underscored a truth I’d already learned: relying solely on an electric refrigerator or freezer, or even a community’s grocery store supply chain, is a fragile existence. Modern food systems are incredibly efficient but also incredibly vulnerable. A natural disaster, an economic downturn, or even just a prolonged power outage can quickly deplete store shelves and render electric appliances useless. Learning how to preserve food without electricity empowers you to take control of your food security. Beyond emergency preparedness, these methods offer immense benefits for everyday off-grid living. They allow you to capture the peak freshness and nutritional value of your garden’s harvest, preventing waste and ensuring a diverse diet year-round. It’s an economic advantage too; buying in bulk during peak season or harvesting your own produce and preserving it yourself is significantly cheaper than purchasing out-of-season items. For example, a 50-pound bag of organic carrots might cost $30 in the fall, but buying the same amount over the winter in small batches could easily triple that cost. Preserving them eliminates that premium. Moreover, these traditional techniques often enhance the flavor and nutritional profile of foods. Fermented foods, for instance, introduce beneficial probiotics, while sun-dried fruits concentrate their natural sugars and nutrients. It’s a return to the wisdom of our ancestors, a connection to the cycles of nature, and a profound sense of satisfaction knowing that you can sustain yourself and your loved ones without external dependencies. This knowledge is an investment in your future, providing peace of mind and tangible security. 9 Proven Methods for Preserving Food Without ElectricityOver my years living off-grid, I’ve experimented with countless preservation techniques. These nine methods have proven to be the most reliable, efficient, and practical for keeping our pantry full without relying on the grid. Each one offers unique benefits and challenges, but with a bit of practice, you’ll master them all. 1. Salting and CuringSalting, or curing, is one of the oldest methods of food preservation, primarily used for meat and fish. Salt draws out moisture through osmosis, inhibiting bacterial growth. I’ve used this extensively for preserving pork and fish catches.
2. Drying (Dehydration)Drying removes moisture, stopping microbial growth. This is incredibly versatile for fruits, vegetables, and even lean meats (jerky). My preferred non-electric method is solar dehydration or air drying.
3. FermentationFermentation uses beneficial bacteria to convert sugars into lactic acid, creating an acidic environment that preserves food and enhances its nutritional value. Sauerkraut, kimchi, and lacto-fermented pickles are staples in my pantry.
4. Root CellaringA root cellar provides a naturally cool, dark, and humid environment ideal for storing root vegetables, fruits, and even some fermented foods without electricity. My underground root cellar is invaluable.
5. Oil PackingSubmerging food in oil creates an anaerobic barrier, preventing air-borne spoilage. This method is excellent for herbs, cooked vegetables, and even some cheeses, though it requires attention to safety to prevent botulism.
6. Water Bath and Pressure Canning (Non-Electric)Canning uses heat to seal food in airtight jars, destroying spoilage organisms. While many canners are electric, you can easily use a stovetop canner over a propane burner or wood-fired stove. I rely heavily on this for fruits, vegetables, and meats.
7. SugaringHigh sugar concentrations prevent microbial growth by drawing out moisture. This is excellent for fruits, making jams, jellies, and candied fruits. I make a lot of fruit preserves this way.
8. SmokingSmoking uses smoke from smoldering wood to impart flavor and preserve food, primarily meats and fish, through dehydration and antimicrobial compounds in the smoke. I have a small, homemade smokehouse.
9. Ash PackingAsh packing is an old, less common but effective method for preserving eggs, particularly during periods of abundance. The alkaline environment of the ash seals the egg pores, preventing air and bacteria from entering.
Best Products/Options in 2026 with Real PricesWhen you’re committed to preserving food without electricity, having the right tools makes all the difference. While many items can be DIY, some specialized products significantly improve efficiency, safety, and longevity. Here are my top recommendations for essential gear, along with current market prices (as of early 2026, based on my recent purchases and research):
Detailed Comparison TableTo help you decide which methods might be best for your specific needs, here’s a comparison of five popular non-electric food preservation techniques:
|
- Prepare Fruit: Wash and chop ripe fruit. For jams, I often use 4 cups of crushed fruit (e.g., berries).
- Combine with Sugar & Pectin (Optional): Combine fruit with sugar in a large pot. A common ratio is 1:1 fruit to sugar by volume for traditional jams, but you can reduce sugar with added pectin (e.g., Ball RealFruit Classic Pectin, $5/box). For 4 cups of fruit, I might use 3-4 cups of sugar.
- Cook: Bring the mixture to a rolling boil over a heat source like a propane stove or wood stove. Stir constantly to prevent scorching. For jam, boil until it reaches the gelling point (220°F / 104°C on a candy thermometer, or passes the cold plate test).
- Ladle into Jars: Quickly ladle the hot jam/jelly into hot, sterilized jars, leaving 1/4 inch headspace.
- Seal & Process: Wipe rims, apply lids and bands finger-tight. Process in a water bath canner (as described in method 6) for the time specified in your recipe (e.g., 10-15 minutes for most jams). This ensures a vacuum seal and long-term shelf stability at room temperature.
- Cool & Store: Cool undisturbed for 12-24 hours. Check seals. Store in a cool, dark place.
8. Smoking
Smoking uses smoke from smoldering wood to impart flavor and preserve food, primarily meats and fish, through dehydration and antimicrobial compounds in the smoke. I have a small, homemade smokehouse.
- Prepare Food: Meat or fish must be cured with salt first (as in method 1) to remove significant moisture and kill surface bacteria. This is crucial for safety and shelf stability. After curing, rinse and pat dry.
- Choose Smoking Wood: Hardwoods like hickory, apple, cherry, or oak are excellent. Avoid softwoods. I use wood chips (Western BBQ Smoking Chips, Hickory, 2lb bag for $8) or sawdust from my own logs.
- Set Up Smoker (Cold Smoking): For long-term preservation, cold smoking (below 80°F / 27°C) is preferred. This requires a smoke generator (e.g., an A-MAZE-N Tube Smoker, $30, which burns pellets/sawdust for hours) placed in a separate firebox, with smoke piped into a smokehouse or large cabinet where the food hangs. The smokehouse should have good ventilation to allow smoke to circulate and exit. My smokehouse is a simple 4ft x 4ft x 6ft wooden shed with vents.
- Smoke the Food: Hang cured meat/fish in the smokehouse. Ignite the wood source in the smoke generator. Smoke for several days, replenishing wood as needed. The duration depends on the food type and desired level of smoke and dryness. For a 5lb salmon fillet, I might smoke for 12-24 hours. For a larger ham, it could be weeks of intermittent smoking.
- Monitor Temperature & Airflow: Ensure the temperature inside the smokehouse remains low to avoid cooking the food. Good airflow is vital for proper drying and smoke penetration.
- Store: Once smoked, the food will be significantly drier and firmer. Store in a cool, dry, well-ventilated area, or wrap tightly and hang in a root cellar for extended preservation.
9. Ash Packing
Ash packing is an old, less common but effective method for preserving eggs, particularly during periods of abundance. The alkaline environment of the ash seals the egg pores, preventing air and bacteria from entering.
- Source Fresh Eggs: Use only very fresh, unwashed eggs from healthy hens. Do NOT wash the eggs, as this removes the protective bloom.
- Gather Ash: Use clean, fine wood ash from hardwoods (e.g., oak, maple, fruitwoods). Ensure it’s completely cold and free of charcoal chunks or debris. Sift it to get a fine powder.
- Prepare Container: Use a sturdy, airtight container like a wooden crate, a ceramic crock, or a large galvanized metal bin. Line the bottom with an inch or two of sifted ash.
- Layer Eggs and Ash: Gently place a layer of eggs on the ash bed, ensuring they don’t touch each other or the sides of the container. Then, cover them completely with another layer of ash, making sure every egg is fully buried.
- Repeat Layers: Continue layering eggs and ash until the container is full, leaving about 2 inches of ash on top.
- Seal & Store: Cover the container tightly with a lid. Store in a cool, dry place, such as a root cellar or a cool pantry, away from temperature fluctuations. The ideal temperature is around 40-55°F (4-13°C).
- Shelf Life: Eggs preserved this way can last 6-12 months, sometimes even longer. Before use, simply brush off the ash. The eggs will still be fresh enough for most culinary uses, though they may not whip up quite as light as fresh eggs.
Best Products/Options in 2026 with Real Prices
When you’re committed to preserving food without electricity, having the right tools makes all the difference. While many items can be DIY, some specialized products significantly improve efficiency, safety, and longevity. Here are my top recommendations for essential gear, along with current market prices (as of early 2026, based on my recent purchases and research):
- Canning System (Non-Electric): For stovetop canning, I highly recommend the Presto 01781 23-Quart Pressure Canner and Cooker. This versatile unit ($110-$130) doubles as a water bath canner and a pressure canner, making it indispensable. Pair it with a robust outdoor propane burner like the Camp Chef Explorer 2-Burner Stove ($170-$200), which delivers ample BTUs (30,000 BTU per burner) to quickly bring large canners to temperature, even in cooler weather.
- Canning Jars & Lids: Stick with trusted brands like Ball or Kerr. A 12-pack of Ball Wide Mouth Quart Jars typically costs $15-$20. Always use new lids for each canning session (Ball Wide Mouth Lids, 12-pack, $5-$7).
- Fermentation Crocks: For serious fermentation, invest in a water-sealed crock. The Harsch Gairtopf Fermentation Crock (5-liter) is a German-made workhorse, costing around $120-$150. Its water moat design creates a perfect anaerobic environment. For smaller batches or beginners, a Kilner Fermentation Jar Set (3-liter) with an airlock is a good starting point at $40-$50.
- Salt for Curing/Fermenting: Purity is key. I consistently use Morton Coarse Pickling Salt, which comes in a 25lb bag for about $18-$22. For a premium option, Redmond Real Salt (5lb bag) is excellent for dry curing and costs around $25-$30.
- Solar Dehydrator: While DIY plans are abundant, if you’re looking for a pre-built option, consider a compact, passive solar dehydrator like the Harvest Right Solar Dehydrator (DIY kit). While Harvest Right is known for freeze-dryers, some smaller companies offer passive solar kits that range from $200-$500 depending on size and materials (e.g., a 4-tray model with polycarbonate panels). Alternatively, a simple set of stainless steel drying screens (e.g., Excalibur Stainless Steel Drying Sheets, 14×14 inch, 4-pack for $40) can be used in a homemade wooden frame.
- Root Cellar Monitoring: Accurate temperature and humidity are vital. The AcuRite 00613 Indoor Humidity Monitor and Thermometer ($12-$15) is reliable and battery-powered (lasts months on a single AA battery), perfect for continuous monitoring. For ventilation, 4-inch Schedule 40 PVC pipe costs about $20-$25 for a 10-foot length.
- Smoking Gear: For cold smoking, a simple and effective tool is the A-MAZE-N Tube Smoker (12-inch), priced at $30-$40. It burns wood pellets or sawdust for up to 4-6 hours, producing clean, consistent smoke. Pair this with a dedicated, well-ventilated smokehouse (DIY build costs can range from $100 for a small cabinet to $500+ for a shed-sized structure using reclaimed wood and basic hardware).
- Oil for Packing: For safety, always use fresh, good-quality oil. Kirkland Signature Extra Virgin Olive Oil (3L bottle) from Costco is an economical and high-quality choice at $25-$30.
Detailed Comparison Table
To help you decide which methods might be best for your specific needs, here’s a comparison of five popular non-electric food preservation techniques:
| Method | Typical Shelf Life | Initial Cost (Approx.) | Skill Level Required | Space Required | Primary Equipment | ||
|---|---|---|---|---|---|---|---|
| 1. Salting/C
Living off the grid has taught me many invaluable skills, but perhaps none as critical as understanding how to preserve food without electricity. When the grid goes down, or you’ve simply chosen a lifestyle independent of it, your ability to keep food safe, nutritious, and delicious becomes paramount. For over a decade, my family and I have relied on ancient, time-tested methods, alongside some modern non-electric innovations, to stock our pantry year-round. This isn’t just about survival; it’s about self-sufficiency, reducing waste, and enjoying the bounty of your garden long after the harvest. In this comprehensive guide, I’ll share nine proven methods that don’t require a single watt of power. We’ll delve into the specifics, from selecting the right ingredients to the exact steps involved, complete with product recommendations and real-world costs. You’ll learn the secrets to turning your harvest into a sustainable food supply, ensuring your family is well-fed, come what may. My goal is to equip you with the knowledge and confidence to master these essential off-grid food preservation techniques, just as I have. Why This Matters / BackgroundFor those of us who’ve embraced the off-grid lifestyle, or even for the preparedness-minded individual, the ability to preserve food without electricity isn’t just a quaint hobby; it’s a fundamental pillar of resilience and self-reliance. I remember vividly one winter, about seven years ago, when an unexpected ice storm brought down power lines across our entire county for nearly two weeks. While neighbors struggled to keep their refrigerators cold with bags of ice and watched their freezers slowly thaw, my root cellar was humming along at a steady 38°F (3.3°C), full of potatoes, carrots, and apples. Our shelves, stocked with fermented vegetables and jars of canned goods, provided a constant stream of nourishment. This experience underscored a truth I’d already learned: relying solely on an electric refrigerator or freezer, or even a community’s grocery store supply chain, is a fragile existence. Modern food systems are incredibly efficient but also incredibly vulnerable. A natural disaster, an economic downturn, or even just a prolonged power outage can quickly deplete store shelves and render electric appliances useless. Learning how to preserve food without electricity empowers you to take control of your food security. Beyond emergency preparedness, these methods offer immense benefits for everyday off-grid living. They allow you to capture the peak freshness and nutritional value of your garden’s harvest, preventing waste and ensuring a diverse diet year-round. It’s an economic advantage too; buying in bulk during peak season or harvesting your own produce and preserving it yourself is significantly cheaper than purchasing out-of-season items. For example, a 50-pound bag of organic carrots might cost $30 in the fall, but buying the same amount over the winter in small batches could easily triple that cost. Preserving them eliminates that premium. Moreover, these traditional techniques often enhance the flavor and nutritional profile of foods. Fermented foods, for instance, introduce beneficial probiotics, while sun-dried fruits concentrate their natural sugars and nutrients. It’s a return to the wisdom of our ancestors, a connection to the cycles of nature, and a profound sense of satisfaction knowing that you can sustain yourself and your loved ones without external dependencies. This knowledge is an investment in your future, providing peace of mind and tangible security. 9 Proven Methods for Preserving Food Without ElectricityOver my years living off-grid, I’ve experimented with countless preservation techniques. These nine methods have proven to be the most reliable, efficient, and practical for keeping our pantry full without relying on the grid. Each one offers unique benefits and challenges, but with a bit of practice, you’ll master them all. 1. Salting and CuringSalting, or curing, is one of the oldest methods of food preservation, primarily used for meat and fish. Salt draws out moisture through osmosis, inhibiting bacterial growth. I’ve used this extensively for preserving pork and fish catches.
2. Drying (Dehydration)Drying removes moisture, stopping microbial growth. This is incredibly versatile for fruits, vegetables, and even lean meats (jerky). My preferred non-electric method is solar dehydration or air drying.
3. FermentationFermentation uses beneficial bacteria to convert sugars into lactic acid, creating an acidic environment that preserves food and enhances its nutritional value. Sauerkraut, kimchi, and lacto-fermented pickles are staples in my pantry.
4. Root CellaringA root cellar provides a naturally cool, dark, and humid environment ideal for storing root vegetables, fruits, and even some fermented foods without electricity. My underground root cellar is invaluable.
5. Oil PackingSubmerging food in oil creates an anaerobic barrier, preventing air-borne spoilage. This method is excellent for herbs, cooked vegetables, and even some cheeses, though it requires attention to safety to prevent botulism.
6. Water Bath and Pressure Canning (Non-Electric)Canning uses heat to seal food in airtight jars, destroying spoilage organisms. While many canners are electric, you can easily use a stovetop canner over a propane burner or wood-fired stove. I rely heavily on this for fruits, vegetables, and meats.
7. SugaringHigh sugar concentrations prevent microbial growth by drawing out moisture. This is excellent for fruits, making jams, jellies, and candied fruits. I make a lot of fruit preserves this way.
8. SmokingSmoking uses smoke from smoldering wood to impart flavor and preserve food, primarily meats and fish, through dehydration and antimicrobial compounds in the smoke. I have a small, homemade smokehouse.
9. Ash PackingAsh packing is an old, less common but effective method for preserving eggs, particularly during periods of abundance. The alkaline environment of the ash seals the egg pores, preventing air and bacteria from entering.
Best Products/Options in 2026 with Real PricesWhen you’re committed to preserving food without electricity, having the right tools makes all the difference. While many items can be DIY, some specialized products significantly improve efficiency, safety, and longevity. Here are my top recommendations for essential gear, along with current market prices (as of early 2026, based on my recent purchases and research):
Detailed Comparison TableTo help you decide which methods might be best for your specific needs, here’s a comparison of five popular non-electric food preservation techniques:
|
9. Ash Packing
Ash packing is an old, less common but effective method for preserving eggs, particularly during periods of abundance. The alkaline environment of the ash seals the egg pores, preventing air and bacteria from entering.
- Source Fresh Eggs: Use only very fresh, unwashed eggs from healthy hens. Do NOT wash the eggs, as this removes the protective bloom.
- Gather Ash: Use clean, fine wood ash from hardwoods (e.g., oak, maple, fruitwoods). Ensure it’s completely cold and free of charcoal chunks or debris. Sift it to get a fine powder.
- Prepare Container: Use a sturdy, airtight container like a wooden crate, a ceramic crock, or a large galvanized metal bin. Line the bottom with an inch or two of sifted ash.
- Layer Eggs and Ash: Gently place a layer of eggs on the ash bed, ensuring they don’t touch each other or the sides of the container. Then, cover them completely with another layer of ash, making sure every egg is fully buried.
- Repeat Layers: Continue layering eggs and ash until the container is full, leaving about 2 inches of ash on top.
- Seal & Store: Cover the container tightly with a lid. Store in a cool, dry place, such as a root cellar or a cool pantry, away from temperature fluctuations. The ideal temperature is around 40-55°F (4-13°C).
- Shelf Life: Eggs preserved this way can last 6-12 months, sometimes even longer. Before use, simply brush off the ash. The eggs will still be fresh enough for most culinary uses, though they may not whip up quite as light as fresh eggs.
Best Products/Options in 2026 with Real Prices
When you’re committed to preserving food without electricity, having the right tools makes all the difference. While many items can be DIY, some specialized products significantly improve efficiency, safety, and longevity. Here are my top recommendations for essential gear, along with current market prices (as of early 2026, based on my recent purchases and research):
- Canning System (Non-Electric): For stovetop canning, I highly recommend the Presto 01781 23-Quart Pressure Canner and Cooker. This versatile unit ($110-$130) doubles as a water bath canner and a pressure canner, making it indispensable. Pair it with a robust outdoor propane burner like the Camp Chef Explorer 2-Burner Stove ($170-$200), which delivers ample BTUs (30,000 BTU per burner) to quickly bring large canners to temperature, even in cooler weather.
- Canning Jars & Lids: Stick with trusted brands like Ball or Kerr. A 12-pack of Ball Wide Mouth Quart Jars typically costs $15-$20. Always use new lids for each canning session (Ball Wide Mouth Lids, 12-pack, $5-$7).
- Fermentation Crocks: For serious fermentation, invest in a water-sealed crock. The Harsch Gairtopf Fermentation Crock (5-liter) is a German-made workhorse, costing around $120-$150. Its water moat design creates a perfect anaerobic environment. For smaller batches or beginners, a Kilner Fermentation Jar Set (3-liter) with an airlock is a good starting point at $40-$50.
- Salt for Curing/Fermenting: Purity is key. I consistently use Morton Coarse Pickling Salt, which comes in a 25lb bag for about $18-$22. For a premium option, Redmond Real Salt (5lb bag) is excellent for dry curing and costs around $25-$30.
- Solar Dehydrator: While DIY plans are abundant, if you’re looking for a pre-built option, consider a compact, passive solar dehydrator like the Harvest Right Solar Dehydrator (DIY kit). While Harvest Right is known for freeze-dryers, some smaller companies offer passive solar kits that range from $200-$500 depending on size and materials (e.g., a 4-tray model with polycarbonate panels). Alternatively, a simple set of stainless steel drying screens (e.g., Excalibur Stainless Steel Drying Sheets, 14×14 inch, 4-pack for $40) can be used in a homemade wooden frame.
- Root Cellar Monitoring: Accurate temperature and humidity are vital. The AcuRite 00613 Indoor Humidity Monitor and Thermometer ($12-$15) is reliable and battery-powered (lasts months on a single AA battery), perfect for continuous monitoring. For ventilation, 4-inch Schedule 40 PVC pipe costs about $20-$25 for a 10-foot length.
- Smoking Gear: For cold smoking, a simple and effective tool is the A-MAZE-N Tube Smoker (12-inch), priced at $30-$40. It burns wood pellets or sawdust for up to 4-6 hours, producing clean, consistent smoke. Pair this with a dedicated, well-ventilated smokehouse (DIY build costs can range from $100 for a small cabinet to $500+ for a shed-sized structure using reclaimed wood and basic hardware).
- Oil for Packing: For safety, always use fresh, good-quality oil. Kirkland Signature Extra Virgin Olive Oil (3L bottle) from Costco is an economical and high-quality choice at $25-$30.
Detailed Comparison Table
To help you decide which methods might be best for your specific needs, here’s a comparison of five popular non-electric food preservation techniques:
| Method | Typical Shelf Life | Initial Cost (Approx.) | Skill Level Required | Space Required | Primary Equipment | |||||||||
|---|---|---|---|---|---|---|---|---|---|---|---|---|---|---|
1. Salting/C
8. SmokingSmoking uses smoke from smoldering wood to impart flavor and preserve food, primarily meats and fish, through dehydration and antimicrobial compounds in the smoke. I have a small, homemade smokehouse.
9. Ash PackingAsh packing is an old, less common but effective method for preserving eggs, particularly during periods of abundance. The alkaline environment of the ash seals the egg pores, preventing air and bacteria from entering.
Best Products/Options in 2026 with Real PricesWhen you’re committed to preserving food without electricity, having the right tools makes all the difference. While many items can be DIY, some specialized products significantly improve efficiency, safety, and longevity. Here are my top recommendations for essential gear, along with current market prices (as of early 2026, based on my recent purchases and research):
Detailed Comparison TableTo help you decide which methods might be best for your specific needs, here’s a comparison of five popular non-electric food preservation techniques:
|
- Prepare Food: Meat or fish must be cured with salt first (as in method 1) to remove significant moisture and kill surface bacteria. This is crucial for safety and shelf stability. After curing, rinse and pat dry.
- Choose Smoking Wood: Hardwoods like hickory, apple, cherry, or oak are excellent. Avoid softwoods. I use wood chips (Western BBQ Smoking Chips, Hickory, 2lb bag for $8) or sawdust from my own logs.
- Set Up Smoker (Cold Smoking): For long-term preservation, cold smoking (below 80°F / 27°C) is preferred. This requires a smoke generator (e.g., an A-MAZE-N Tube Smoker, $30, which burns pellets/sawdust for hours) placed in a separate firebox, with smoke piped into a smokehouse or large cabinet where the food hangs. The smokehouse should have good ventilation to allow smoke to circulate and exit. My smokehouse is a simple 4ft x 4ft x 6ft wooden shed with vents.
- Smoke the Food: Hang cured meat/fish in the smokehouse. Ignite the wood source in the smoke generator. Smoke for several days, replenishing wood as needed. The duration depends on the food type and desired level of smoke and dryness. For a 5lb salmon fillet, I might smoke for 12-24 hours. For a larger ham, it could be weeks of intermittent smoking.
- Monitor Temperature & Airflow: Ensure the temperature inside the smokehouse remains low to avoid cooking the food. Good airflow is vital for proper drying and smoke penetration.
- Store: Once smoked, the food will be significantly drier and firmer. Store in a cool, dry, well-ventilated area, or wrap tightly and hang in a root cellar for extended preservation.
9. Ash Packing
Ash packing is an old, less common but effective method for preserving eggs, particularly during periods of abundance. The alkaline environment of the ash seals the egg pores, preventing air and bacteria from entering.
- Source Fresh Eggs: Use only very fresh, unwashed eggs from healthy hens. Do NOT wash the eggs, as this removes the protective bloom.
- Gather Ash: Use clean, fine wood ash from hardwoods (e.g., oak, maple, fruitwoods). Ensure it’s completely cold and free of charcoal chunks or debris. Sift it to get a fine powder.
- Prepare Container: Use a sturdy, airtight container like a wooden crate, a ceramic crock, or a large galvanized metal bin. Line the bottom with an inch or two of sifted ash.
- Layer Eggs and Ash: Gently place a layer of eggs on the ash bed, ensuring they don’t touch each other or the sides of the container. Then, cover them completely with another layer of ash, making sure every egg is fully buried.
- Repeat Layers: Continue layering eggs and ash until the container is full, leaving about 2 inches of ash on top.
- Seal & Store: Cover the container tightly with a lid. Store in a cool, dry place, such as a root cellar or a cool pantry, away from temperature fluctuations. The ideal temperature is around 40-55°F (4-13°C).
- Shelf Life: Eggs preserved this way can last 6-12 months, sometimes even longer. Before use, simply brush off the ash. The eggs will still be fresh enough for most culinary uses, though they may not whip up quite as light as fresh eggs.
Best Products/Options in 2026 with Real Prices
When you’re committed to preserving food without electricity, having the right tools makes all the difference. While many items can be DIY, some specialized products significantly improve efficiency, safety, and longevity. Here are my top recommendations for essential gear, along with current market prices (as of early 2026, based on my recent purchases and research):
- Canning System (Non-Electric): For stovetop canning, I highly recommend the Presto 01781 23-Quart Pressure Canner and Cooker. This versatile unit ($110-$130) doubles as a water bath canner and a pressure canner, making it indispensable. Pair it with a robust outdoor propane burner like the Camp Chef Explorer 2-Burner Stove ($170-$200), which delivers ample BTUs (30,000 BTU per burner) to quickly bring large canners to temperature, even in cooler weather.
- Canning Jars & Lids: Stick with trusted brands like Ball or Kerr. A 12-pack of Ball Wide Mouth Quart Jars typically costs $15-$20. Always use new lids for each canning session (Ball Wide Mouth Lids, 12-pack, $5-$7).
- Fermentation Crocks: For serious fermentation, invest in a water-sealed crock. The Harsch Gairtopf Fermentation Crock (5-liter) is a German-made workhorse, costing around $120-$150. Its water moat design creates a perfect anaerobic environment. For smaller batches or beginners, a Kilner Fermentation Jar Set (3-liter) with an airlock is a good starting point at $40-$50.
- Salt for Curing/Fermenting: Purity is key. I consistently use Morton Coarse Pickling Salt, which comes in a 25lb bag for about $18-$22. For a premium option, Redmond Real Salt (5lb bag) is excellent for dry curing and costs around $25-$30.
- Solar Dehydrator: While DIY plans are abundant, if you’re looking for a pre-built option, consider a compact, passive solar dehydrator like the Harvest Right Solar Dehydrator (DIY kit). While Harvest Right is known for freeze-dryers, some smaller companies offer passive solar kits that range from $200-$500 depending on size and materials (e.g., a 4-tray model with polycarbonate panels). Alternatively, a simple set of stainless steel drying screens (e.g., Excalibur Stainless Steel Drying Sheets, 14×14 inch, 4-pack for $40) can be used in a homemade wooden frame.
- Root Cellar Monitoring: Accurate temperature and humidity are vital. The AcuRite 00613 Indoor Humidity Monitor and Thermometer ($12-$15) is reliable and battery-powered (lasts months on a single AA battery), perfect for continuous monitoring. For ventilation, 4-inch Schedule 40 PVC pipe costs about $20-$25 for a 10-foot length.
- Smoking Gear: For cold smoking, a simple and effective tool is the A-MAZE-N Tube Smoker (12-inch), priced at $30-$40. It burns wood pellets or sawdust for up to 4-6 hours, producing clean, consistent smoke. Pair this with a dedicated, well-ventilated smokehouse (DIY build costs can range from $100 for a small cabinet to $500+ for a shed-sized structure using reclaimed wood and basic hardware).
- Oil for Packing: For safety, always use fresh, good-quality oil. Kirkland Signature Extra Virgin Olive Oil (3L bottle) from Costco is an economical and high-quality choice at $25-$30.
Detailed Comparison Table
To help you decide which methods might be best for your specific needs, here’s a comparison of five popular non-electric food preservation techniques:
| Method | Typical Shelf Life | Initial Cost (Approx.) | Skill Level Required | Space Required | Primary Equipment | |||||||||
|---|---|---|---|---|---|---|---|---|---|---|---|---|---|---|
1. Salting/C
8. SmokingSmoking uses smoke from smoldering wood to impart flavor and preserve food, primarily meats and fish, through dehydration and antimicrobial compounds in the smoke. I have a small, homemade smokehouse.
9. Ash PackingAsh packing is an old, less common but effective method for preserving eggs, particularly during periods of abundance. The alkaline environment of the ash seals the egg pores, preventing air and bacteria from entering.
Best Products/Options in 2026 with Real PricesWhen you’re committed to preserving food without electricity, having the right tools makes all the difference. While many items can be DIY, some specialized products significantly improve efficiency, safety, and longevity. Here are my top recommendations for essential gear, along with current market prices (as of early 2026, based on my recent purchases and research):
Detailed Comparison TableTo help you decide which methods might be best for your specific needs, here’s a comparison of five popular non-electric food preservation techniques:
|
- Prepare Food: Meat or fish must be cured with salt first (as in method 1) to remove significant moisture and kill surface bacteria. This is crucial for safety and shelf stability. After curing, rinse and pat dry.
- Choose Smoking Wood: Hardwoods like hickory, apple, cherry, or oak are excellent. Avoid softwoods. I use wood chips (Western BBQ Smoking Chips, Hickory, 2lb bag for $8) or sawdust from my own logs.
- Set Up Smoker (Cold Smoking): For long-term preservation, cold smoking (below 80°F / 27°C) is preferred. This requires a smoke generator (e.g., an A-MAZE-N Tube Smoker, $30, which burns pellets/sawdust for hours) placed in a separate firebox, with smoke piped into a smokehouse or large cabinet where the food hangs. The smokehouse should have good ventilation to allow smoke to circulate and exit. My smokehouse is a simple 4ft x 4ft x 6ft wooden shed with vents.
- Smoke the Food: Hang cured meat/fish in the smokehouse. Ignite the wood source in the smoke generator. Smoke for several days, replenishing wood as needed. The duration depends on the food type and desired level of smoke and dryness. For a 5lb salmon fillet, I might smoke for 12-24 hours. For a larger ham, it could be weeks of intermittent smoking.
- Monitor Temperature & Airflow: Ensure the temperature inside the smokehouse remains low to avoid cooking the food. Good airflow is vital for proper drying and smoke penetration.
- Store: Once smoked, the food will be significantly drier and firmer. Store in a cool, dry, well-ventilated area, or wrap tightly and hang in a root cellar for extended preservation.
9. Ash Packing
Ash packing is an old, less common but effective method for preserving eggs, particularly during periods of abundance. The alkaline environment of the ash seals the egg pores, preventing air and bacteria from entering.
- Source Fresh Eggs: Use only very fresh, unwashed eggs from healthy hens. Do NOT wash the eggs, as this removes the protective bloom.
- Gather Ash: Use clean, fine wood ash from hardwoods (e.g., oak, maple, fruitwoods). Ensure it’s completely cold and free of charcoal chunks or debris. Sift it to get a fine powder.
- Prepare Container: Use a sturdy, airtight container like a wooden crate, a ceramic crock, or a large galvanized metal bin. Line the bottom with an inch or two of sifted ash.
- Layer Eggs and Ash: Gently place a layer of eggs on the ash bed, ensuring they don’t touch each other or the sides of the container. Then, cover them completely with another layer of ash, making sure every egg is fully buried.
- Repeat Layers: Continue layering eggs and ash until the container is full, leaving about 2 inches of ash on top.
- Seal & Store: Cover the container tightly with a lid. Store in a cool, dry place, such as a root cellar or a cool pantry, away from temperature fluctuations. The ideal temperature is around 40-55°F (4-13°C).
- Shelf Life: Eggs preserved this way can last 6-12 months, sometimes even longer. Before use, simply brush off the ash. The eggs will still be fresh enough for most culinary uses, though they may not whip up quite as light as fresh eggs.
Best Products/Options in 2026 with Real Prices
When you’re committed to preserving food without electricity, having the right tools makes all the difference. While many items can be DIY, some specialized products significantly improve efficiency, safety, and longevity. Here are my top recommendations for essential gear, along with current market prices (as of early 2026, based on my recent purchases and research):
- Canning System (Non-Electric): For stovetop canning, I highly recommend the Presto 01781 23-Quart Pressure Canner and Cooker. This versatile unit ($110-$130) doubles as a water bath canner and a pressure canner, making it indispensable. Pair it with a robust outdoor propane burner like the Camp Chef Explorer 2-Burner Stove ($170-$200), which delivers ample BTUs (30,000 BTU per burner) to quickly bring large canners to temperature, even in cooler weather.
- Canning Jars & Lids: Stick with trusted brands like Ball or Kerr. A 12-pack of Ball Wide Mouth Quart Jars typically costs $15-$20. Always use new lids for each canning session (Ball Wide Mouth Lids, 12-pack, $5-$7).
- Fermentation Crocks: For serious fermentation, invest in a water-sealed crock. The Harsch Gairtopf Fermentation Crock (5-liter) is a German-made workhorse, costing around $120-$150. Its water moat design creates a perfect anaerobic environment. For smaller batches or beginners, a Kilner Fermentation Jar Set (3-liter) with an airlock is a good starting point at $40-$50.
- Salt for Curing/Fermenting: Purity is key. I consistently use Morton Coarse Pickling Salt, which comes in a 25lb bag for about $18-$22. For a premium option, Redmond Real Salt (5lb bag) is excellent for dry curing and costs around $25-$30.
- Solar Dehydrator: While DIY plans are abundant, if you’re looking for a pre-built option, consider a compact, passive solar dehydrator like the Harvest Right Solar Dehydrator (DIY kit). While Harvest Right is known for freeze-dryers, some smaller companies offer passive solar kits that range from $200-$500 depending on size and materials (e.g., a 4-tray model with polycarbonate panels). Alternatively, a simple set of stainless steel drying screens (e.g., Excalibur Stainless Steel Drying Sheets, 14×14 inch, 4-pack for $40) can be used in a homemade wooden frame.
- Root Cellar Monitoring: Accurate temperature and humidity are vital. The AcuRite 00613 Indoor Humidity Monitor and Thermometer ($12-$15) is reliable and battery-powered (lasts months on a single AA battery), perfect for continuous monitoring. For ventilation, 4-inch Schedule 40 PVC pipe costs about $20-$25 for a 10-foot length.
- Smoking Gear: For cold smoking, a simple and effective tool is the A-MAZE-N Tube Smoker (12-inch), priced at $30-$40. It burns wood pellets or sawdust for up to 4-6 hours, producing clean, consistent smoke. Pair this with a dedicated, well-ventilated smokehouse (DIY build costs can range from $100 for a small cabinet to $500+ for a shed-sized structure using reclaimed wood and basic hardware).
- Oil for Packing: For safety, always use fresh, good-quality oil. Kirkland Signature Extra Virgin Olive Oil (3L bottle) from Costco is an economical and high-quality choice at $25-$30.
Detailed Comparison Table
To help you decide which methods might be best for your specific needs, here’s a comparison of five popular non-electric food preservation techniques:
| Method | Typical Shelf Life | Initial Cost (Approx.) | Skill Level Required | Space Required | Primary Equipment | |||||||||
|---|---|---|---|---|---|---|---|---|---|---|---|---|---|---|
1. Salting/C
8. SmokingSmoking uses smoke from smoldering wood to impart flavor and preserve food, primarily meats and fish, through dehydration and antimicrobial compounds in the smoke. I have a small, homemade smokehouse.
9. Ash PackingAsh packing is an old, less common but effective method for preserving eggs, particularly during periods of abundance. The alkaline environment of the ash seals the egg pores, preventing air and bacteria from entering.
Best Products/Options in 2026 with Real PricesWhen you’re committed to preserving food without electricity, having the right tools makes all the difference. While many items can be DIY, some specialized products significantly improve efficiency, safety, and longevity. Here are my top recommendations for essential gear, along with current market prices (as of early 2026, based on my recent purchases and research):
Detailed Comparison TableTo help you decide which methods might be best for your specific needs, here’s a comparison of five popular non-electric food preservation techniques:
|
9. Ash Packing
Ash packing is an old, less common but effective method for preserving eggs, particularly during periods of abundance. The alkaline environment of the ash seals the egg pores, preventing air and bacteria from entering.
- Source Fresh Eggs: Use only very fresh, unwashed eggs from healthy hens. Do NOT wash the eggs, as this removes the protective bloom.
- Gather Ash: Use clean, fine wood ash from hardwoods (e.g., oak, maple, fruitwoods). Ensure it’s completely cold and free of charcoal chunks or debris. Sift it to get a fine powder.
- Prepare Container: Use a sturdy, airtight container like a wooden crate, a ceramic crock, or a large galvanized metal bin. Line the bottom with an inch or two of sifted ash.
- Layer Eggs and Ash: Gently place a layer of eggs on the ash bed, ensuring they don’t touch each other or the sides of the container. Then, cover them completely with another layer of ash, making sure every egg is fully buried.
- Repeat Layers: Continue layering eggs and ash until the container is full, leaving about 2 inches of ash on top.
- Seal & Store: Cover the container tightly with a lid. Store in a cool, dry place, such as a root cellar or a cool pantry, away from temperature fluctuations. The ideal temperature is around 40-55°F (4-13°C).
- Shelf Life: Eggs preserved this way can last 6-12 months, sometimes even longer. Before use, simply brush off the ash. The eggs will still be fresh enough for most culinary uses, though they may not whip up quite as light as fresh eggs.
Best Products/Options in 2026 with Real Prices
When you’re committed to preserving food without electricity, having the right tools makes all the difference. While many items can be DIY, some specialized products significantly improve efficiency, safety, and longevity. Here are my top recommendations for essential gear, along with current market prices (as of early 2026, based on my recent purchases and research):
- Canning System (Non-Electric): For stovetop canning, I highly recommend the Presto 01781 23-Quart Pressure Canner and Cooker. This versatile unit ($110-$130) doubles as a water bath canner and a pressure canner, making it indispensable. Pair it with a robust outdoor propane burner like the Camp Chef Explorer 2-Burner Stove ($170-$200), which delivers ample BTUs (30,000 BTU per burner) to quickly bring large canners to temperature, even in cooler weather.
- Canning Jars & Lids: Stick with trusted brands like Ball or Kerr. A 12-pack of Ball Wide Mouth Quart Jars typically costs $15-$20. Always use new lids for each canning session (Ball Wide Mouth Lids, 12-pack, $5-$7).
- Fermentation Crocks: For serious fermentation, invest in a water-sealed crock. The Harsch Gairtopf Fermentation Crock (5-liter) is a German-made workhorse, costing around $120-$150. Its water moat design creates a perfect anaerobic environment. For smaller batches or beginners, a Kilner Fermentation Jar Set (3-liter) with an airlock is a good starting point at $40-$50.
- Salt for Curing/Fermenting: Purity is key. I consistently use Morton Coarse Pickling Salt, which comes in a 25lb bag for about $18-$22. For a premium option, Redmond Real Salt (5lb bag) is excellent for dry curing and costs around $25-$30.
- Solar Dehydrator: While DIY plans are abundant, if you’re looking for a pre-built option, consider a compact, passive solar dehydrator like the Harvest Right Solar Dehydrator (DIY kit). While Harvest Right is known for freeze-dryers, some smaller companies offer passive solar kits that range from $200-$500 depending on size and materials (e.g., a 4-tray model with polycarbonate panels). Alternatively, a simple set of stainless steel drying screens (e.g., Excalibur Stainless Steel Drying Sheets, 14×14 inch, 4-pack for $40) can be used in a homemade wooden frame.
- Root Cellar Monitoring: Accurate temperature and humidity are vital. The AcuRite 00613 Indoor Humidity Monitor and Thermometer ($12-$15) is reliable and battery-powered (lasts months on a single AA battery), perfect for continuous monitoring. For ventilation, 4-inch Schedule 40 PVC pipe costs about $20-$25 for a 10-foot length.
- Smoking Gear: For cold smoking, a simple and effective tool is the A-MAZE-N Tube Smoker (12-inch), priced at $30-$40. It burns wood pellets or sawdust for up to 4-6 hours, producing clean, consistent smoke. Pair this with a dedicated, well-ventilated smokehouse (DIY build costs can range from $100 for a small cabinet to $500+ for a shed-sized structure using reclaimed wood and basic hardware).
- Oil for Packing: For safety, always use fresh, good-quality oil. Kirkland Signature Extra Virgin Olive Oil (3L bottle) from Costco is an economical and high-quality choice at $25-$30.
Detailed Comparison Table
To help you decide which methods might be best for your specific needs, here’s a comparison of five popular non-electric food preservation techniques:
| Method | Typical Shelf Life | Initial Cost (Approx.) | Skill Level Required | Space Required | Primary Equipment | ||||||||||||||||
|---|---|---|---|---|---|---|---|---|---|---|---|---|---|---|---|---|---|---|---|---|---|
1. Salting/C
9. Ash PackingAsh packing is an old, less common but effective method for preserving eggs, particularly during periods of abundance. The alkaline environment of the ash seals the egg pores, preventing air and bacteria from entering.
Best Products/Options in 2026 with Real PricesWhen you’re committed to preserving food without electricity, having the right tools makes all the difference. While many items can be DIY, some specialized products significantly improve efficiency, safety, and longevity. Here are my top recommendations for essential gear, along with current market prices (as of early 2026, based on my recent purchases and research):
Detailed Comparison TableTo help you decide which methods might be best for your specific needs, here’s a comparison of five popular non-electric food preservation techniques:
|
- Prepare Food: Meat or fish must be cured with salt first (as in method 1) to remove significant moisture and kill surface bacteria. This is crucial for safety and shelf stability. After curing, rinse and pat dry.
- Choose Smoking Wood: Hardwoods like hickory, apple, cherry, or oak are excellent. Avoid softwoods. I use wood chips (Western BBQ Smoking Chips, Hickory, 2lb bag for $8) or sawdust from my own logs.
- Set Up Smoker (Cold Smoking): For long-term preservation, cold smoking (below 80°F / 27°C) is preferred. This requires a smoke generator (e.g., an A-MAZE-N Tube Smoker, $30, which burns pellets/sawdust for hours) placed in a separate firebox, with smoke piped into a smokehouse or large cabinet where the food hangs. The smokehouse should have good ventilation to allow smoke to circulate and exit. My smokehouse is a simple 4ft x 4ft x 6ft wooden shed with vents.
- Smoke the Food: Hang cured meat/fish in the smokehouse. Ignite the wood source in the smoke generator. Smoke for several days, replenishing wood as needed. The duration depends on the food type and desired level of smoke and dryness. For a 5lb salmon fillet, I might smoke for 12-24 hours. For a larger ham, it could be weeks of intermittent smoking.
- Monitor Temperature & Airflow: Ensure the temperature inside the smokehouse remains low to avoid cooking the food. Good airflow is vital for proper drying and smoke penetration.
- Store: Once smoked, the food will be significantly drier and firmer. Store in a cool, dry, well-ventilated area, or wrap tightly and hang in a root cellar for extended preservation.
9. Ash Packing
Ash packing is an old, less common but effective method for preserving eggs, particularly during periods of abundance. The alkaline environment of the ash seals the egg pores, preventing air and bacteria from entering.
- Source Fresh Eggs: Use only very fresh, unwashed eggs from healthy hens. Do NOT wash the eggs, as this removes the protective bloom.
- Gather Ash: Use clean, fine wood ash from hardwoods (e.g., oak, maple, fruitwoods). Ensure it’s completely cold and free of charcoal chunks or debris. Sift it to get a fine powder.
- Prepare Container: Use a sturdy, airtight container like a wooden crate, a ceramic crock, or a large galvanized metal bin. Line the bottom with an inch or two of sifted ash.
- Layer Eggs and Ash: Gently place a layer of eggs on the ash bed, ensuring they don’t touch each other or the sides of the container. Then, cover them completely with another layer of ash, making sure every egg is fully buried.
- Repeat Layers: Continue layering eggs and ash until the container is full, leaving about 2 inches of ash on top.
- Seal & Store: Cover the container tightly with a lid. Store in a cool, dry place, such as a root cellar or a cool pantry, away from temperature fluctuations. The ideal temperature is around 40-55°F (4-13°C).
- Shelf Life: Eggs preserved this way can last 6-12 months, sometimes even longer. Before use, simply brush off the ash. The eggs will still be fresh enough for most culinary uses, though they may not whip up quite as light as fresh eggs.
Best Products/Options in 2026 with Real Prices
When you’re committed to preserving food without electricity, having the right tools makes all the difference. While many items can be DIY, some specialized products significantly improve efficiency, safety, and longevity. Here are my top recommendations for essential gear, along with current market prices (as of early 2026, based on my recent purchases and research):
- Canning System (Non-Electric): For stovetop canning, I highly recommend the Presto 01781 23-Quart Pressure Canner and Cooker. This versatile unit ($110-$130) doubles as a water bath canner and a pressure canner, making it indispensable. Pair it with a robust outdoor propane burner like the Camp Chef Explorer 2-Burner Stove ($170-$200), which delivers ample BTUs (30,000 BTU per burner) to quickly bring large canners to temperature, even in cooler weather.
- Canning Jars & Lids: Stick with trusted brands like Ball or Kerr. A 12-pack of Ball Wide Mouth Quart Jars typically costs $15-$20. Always use new lids for each canning session (Ball Wide Mouth Lids, 12-pack, $5-$7).
- Fermentation Crocks: For serious fermentation, invest in a water-sealed crock. The Harsch Gairtopf Fermentation Crock (5-liter) is a German-made workhorse, costing around $120-$150. Its water moat design creates a perfect anaerobic environment. For smaller batches or beginners, a Kilner Fermentation Jar Set (3-liter) with an airlock is a good starting point at $40-$50.
- Salt for Curing/Fermenting: Purity is key. I consistently use Morton Coarse Pickling Salt, which comes in a 25lb bag for about $18-$22. For a premium option, Redmond Real Salt (5lb bag) is excellent for dry curing and costs around $25-$30.
- Solar Dehydrator: While DIY plans are abundant, if you’re looking for a pre-built option, consider a compact, passive solar dehydrator like the Harvest Right Solar Dehydrator (DIY kit). While Harvest Right is known for freeze-dryers, some smaller companies offer passive solar kits that range from $200-$500 depending on size and materials (e.g., a 4-tray model with polycarbonate panels). Alternatively, a simple set of stainless steel drying screens (e.g., Excalibur Stainless Steel Drying Sheets, 14×14 inch, 4-pack for $40) can be used in a homemade wooden frame.
- Root Cellar Monitoring: Accurate temperature and humidity are vital. The AcuRite 00613 Indoor Humidity Monitor and Thermometer ($12-$15) is reliable and battery-powered (lasts months on a single AA battery), perfect for continuous monitoring. For ventilation, 4-inch Schedule 40 PVC pipe costs about $20-$25 for a 10-foot length.
- Smoking Gear: For cold smoking, a simple and effective tool is the A-MAZE-N Tube Smoker (12-inch), priced at $30-$40. It burns wood pellets or sawdust for up to 4-6 hours, producing clean, consistent smoke. Pair this with a dedicated, well-ventilated smokehouse (DIY build costs can range from $100 for a small cabinet to $500+ for a shed-sized structure using reclaimed wood and basic hardware).
- Oil for Packing: For safety, always use fresh, good-quality oil. Kirkland Signature Extra Virgin Olive Oil (3L bottle) from Costco is an economical and high-quality choice at $25-$30.
Detailed Comparison Table
To help you decide which methods might be best for your specific needs, here’s a comparison of five popular non-electric food preservation techniques:
| Method | Typical Shelf Life | Initial Cost (Approx.) | Skill Level Required | Space Required | Primary Equipment | ||||||||||||||||
|---|---|---|---|---|---|---|---|---|---|---|---|---|---|---|---|---|---|---|---|---|---|
1. Salting/C
9. Ash PackingAsh packing is an old, less common but effective method for preserving eggs, particularly during periods of abundance. The alkaline environment of the ash seals the egg pores, preventing air and bacteria from entering.
Best Products/Options in 2026 with Real PricesWhen you’re committed to preserving food without electricity, having the right tools makes all the difference. While many items can be DIY, some specialized products significantly improve efficiency, safety, and longevity. Here are my top recommendations for essential gear, along with current market prices (as of early 2026, based on my recent purchases and research):
Detailed Comparison TableTo help you decide which methods might be best for your specific needs, here’s a comparison of five popular non-electric food preservation techniques:
|
9. Ash Packing
Ash packing is an old, less common but effective method for preserving eggs, particularly during periods of abundance. The alkaline environment of the ash seals the egg pores, preventing air and bacteria from entering.
- Source Fresh Eggs: Use only very fresh, unwashed eggs from healthy hens. Do NOT wash the eggs, as this removes the protective bloom.
- Gather Ash: Use clean, fine wood ash from hardwoods (e.g., oak, maple, fruitwoods). Ensure it’s completely cold and free of charcoal chunks or debris. Sift it to get a fine powder.
- Prepare Container: Use a sturdy, airtight container like a wooden crate, a ceramic crock, or a large galvanized metal bin. Line the bottom with an inch or two of sifted ash.
- Layer Eggs and Ash: Gently place a layer of eggs on the ash bed, ensuring they don’t touch each other or the sides of the container. Then, cover them completely with another layer of ash, making sure every egg is fully buried.
- Repeat Layers: Continue layering eggs and ash until the container is full, leaving about 2 inches of ash on top.
- Seal & Store: Cover the container tightly with a lid. Store in a cool, dry place, such as a root cellar or a cool pantry, away from temperature fluctuations. The ideal temperature is around 40-55°F (4-13°C).
- Shelf Life: Eggs preserved this way can last 6-12 months, sometimes even longer. Before use, simply brush off the ash. The eggs will still be fresh enough for most culinary uses, though they may not whip up quite as light as fresh eggs.
Best Products/Options in 2026 with Real Prices
When you’re committed to preserving food without electricity, having the right tools makes all the difference. While many items can be DIY, some specialized products significantly improve efficiency, safety, and longevity. Here are my top recommendations for essential gear, along with current market prices (as of early 2026, based on my recent purchases and research):
- Canning System (Non-Electric): For stovetop canning, I highly recommend the Presto 01781 23-Quart Pressure Canner and Cooker. This versatile unit ($110-$130) doubles as a water bath canner and a pressure canner, making it indispensable. Pair it with a robust outdoor propane burner like the Camp Chef Explorer 2-Burner Stove ($170-$200), which delivers ample BTUs (30,000 BTU per burner) to quickly bring large canners to temperature, even in cooler weather.
- Canning Jars & Lids: Stick with trusted brands like Ball or Kerr. A 12-pack of Ball Wide Mouth Quart Jars typically costs $15-$20. Always use new lids for each canning session (Ball Wide Mouth Lids, 12-pack, $5-$7).
- Fermentation Crocks: For serious fermentation, invest in a water-sealed crock. The Harsch Gairtopf Fermentation Crock (5-liter) is a German-made workhorse, costing around $120-$150. Its water moat design creates a perfect anaerobic environment. For smaller batches or beginners, a Kilner Fermentation Jar Set (3-liter) with an airlock is a good starting point at $40-$50.
- Salt for Curing/Fermenting: Purity is key. I consistently use Morton Coarse Pickling Salt, which comes in a 25lb bag for about $18-$22. For a premium option, Redmond Real Salt (5lb bag) is excellent for dry curing and costs around $25-$30.
- Solar Dehydrator: While DIY plans are abundant, if you’re looking for a pre-built option, consider a compact, passive solar dehydrator like the Harvest Right Solar Dehydrator (DIY kit). While Harvest Right is known for freeze-dryers, some smaller companies offer passive solar kits that range from $200-$500 depending on size and materials (e.g., a 4-tray model with polycarbonate panels). Alternatively, a simple set of stainless steel drying screens (e.g., Excalibur Stainless Steel Drying Sheets, 14×14 inch, 4-pack for $40) can be used in a homemade wooden frame.
- Root Cellar Monitoring: Accurate temperature and humidity are vital. The AcuRite 00613 Indoor Humidity Monitor and Thermometer ($12-$15) is reliable and battery-powered (lasts months on a single AA battery), perfect for continuous monitoring. For ventilation, 4-inch Schedule 40 PVC pipe costs about $20-$25 for a 10-foot length.
- Smoking Gear: For cold smoking, a simple and effective tool is the A-MAZE-N Tube Smoker (12-inch), priced at $30-$40. It burns wood pellets or sawdust for up to 4-6 hours, producing clean, consistent smoke. Pair this with a dedicated, well-ventilated smokehouse (DIY build costs can range from $100 for a small cabinet to $500+ for a shed-sized structure using reclaimed wood and basic hardware).
- Oil for Packing: For safety, always use fresh, good-quality oil. Kirkland Signature Extra Virgin Olive Oil (3L bottle) from Costco is an economical and high-quality choice at $25-$30.
Detailed Comparison Table
To help you decide which methods might be best for your specific needs, here’s a comparison of five popular non-electric food preservation techniques:
| Method | Typical Shelf Life | Initial Cost (Approx.) | Skill Level Required | Space Required | Primary Equipment | |||||||||||||||||||||||
|---|---|---|---|---|---|---|---|---|---|---|---|---|---|---|---|---|---|---|---|---|---|---|---|---|---|---|---|---|
1. Salting/C
9. Ash PackingAsh packing is an old, less common but effective method for preserving eggs, particularly during periods of abundance. The alkaline environment of the ash seals the egg pores, preventing air and bacteria from entering.
Best Products/Options in 2026 with Real PricesWhen you’re committed to preserving food without electricity, having the right tools makes all the difference. While many items can be DIY, some specialized products significantly improve efficiency, safety, and longevity. Here are my top recommendations for essential gear, along with current market prices (as of early 2026, based on my recent purchases and research):
Detailed Comparison TableTo help you decide which methods might be best for your specific needs, here’s a comparison of five popular non-electric food preservation techniques:
|